- Welcome
- TeamWox Communicator
- Diagrams
- Editor
- Templates
- User Details
- Getting Started
- Browser Settings
- Calendar
- Calls
- Charts
- Exit
- File Viewers
- Filters
- Notifications
- Certificate Installation
- Interface
- List of Assigned
- Mind Map
- Permissions
- Search
- Status
- Google Translate
- Windows
- Home
- Tasks
- Documents
- Service Desk
- Chat
- Organizations
- Contacts
- Board
- Team
- Products
- Accounting
- E-Bank
- Search
- Calendar
- Telephony
- Administration
- Projects
Message Editor
The embedded message editor is used in most modules of TeamWox: in wording tasks, writing various comments, messages on the board, e-mails, etc. The general view of the message editor is shown in the screenshot below. The upper part contains a toolbar, the lower part contains the list of the attachments and the file attachment option. The main part of the message editor is the area for writing and editing of your text.

Toolbar
Different commands for working with body of a message are accumulated at the toolbar.
HTML/VISUAL
You can switch between the visual and HTML text representations by pressing the "HTML" button. This button changes its name to "VISUAL" if you're currently viewing the HTML, and, accordingly, returns you to the visual view of the text. This function allows you to make your text most structured and formalized. See the example.
 Undo/
Undo/ Redo
Redo
These buttons are intended for canceling the last action and redoing the last canceled action, respectively. The same actions can be performed using the Ctrl+Z and Ctrl+Y key combinations.
 Unordered list
This button is intended to make a bulleted list (every item in the list starts with a bullet).
 Ordered list
This button is intended to make an ordered list (every item in the list has an index number).
 Increase indent
This button is intended to decrease the rank of the element in the list.
 Decrease indent
This button is intended to increase the rank of the element in the list. Example of creating a list.
 Horizontal line
This button is intended for inserting a horizontal line into text. The same action can be performed using the Ctrl+H key combination.

This button is used for adding links into messages. The window of the same title appears, as soon as you press this button:

In the "Link" field you should specify the address of the link and then press the "Insert" button. Examples of operations with links are given in the corresponding section. A link can also be inserted by pressing the Ctrl+Alt+L key combination.
 Details
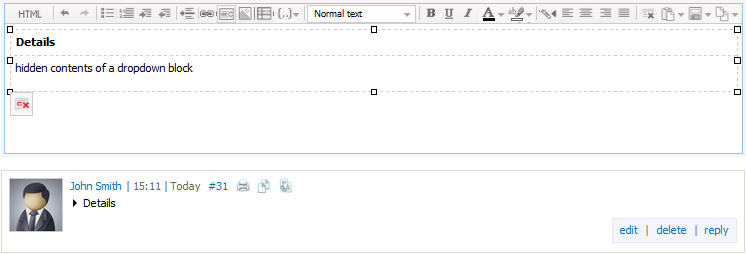
This button allows to add hidden details, off-topic messages and additional large volume information leaving only the subject. To show hidden details, click on the header of the block in the message view mode.
 Image
Image
This button is used for inserting pictures into messages. The window shown in the screenshot below appears, as soon as you press it.

In the "Upload image" field you should specify the picture file. To do it you should press the "Browse" button that opens the standard window of choosing files. You should choose the necessary file and press the "Open" button to finish the choosing or the "Cancel" button to break the operation. In the "Title" field you can specify the comment to the picture that will be displayed as a pop-up help if you move the mouse cursor over the picture.
You can open the Image dialog by pressing the Ctrl+Alt+I key combination.
To quickly insert an image into a text, drag and drop it to the editor window from a folder on your computer. |
 Table
Table
Using this button one can add a table into a message text. The "Add table" window will appear, as soon as you press it:

In order to create a table, you should fill out a number of fields:
- Columns — the number of columns in the table.
- Rows — the number of rows in the table.
- Style — the type of the table. There are three options available: "Standard", "No Border" and "No Header". In order to choose the necessary one, you should press with the left button of your mouse on the down-arrow button at the end of this field. Then you should choose the necessary option from the list.
- Width — the width of the table measured in percentage to the width of the message window.
- Height — the height of the table measured in pixels.
- Padding in cells — the distance between the text and the internal border of cells in the table.
The table preview is located in the right part of the window, under the "Style" field. In order to add the table to the text of your message, you should press the "Insert" button. If you want to break adding the table, you should press the "Cancel" button. The example of operations with tables is given in the corresponding section.
A table can also be inserted by pressing the Ctrl+Alt+T key combination.
 Insert Object
This button opens the menu of inserting different objects into the message body. Their description is given below.
 Code
Code
This button of the object inserting menu is intended to insert the source MQL4/MQL5 code into the text of the message. An empty window to paste the code in appears as soon as you press this button. In order to finish code adding you should press the "Insert" button. To cancel the operation you should press the "Cancel" button. The example of inserting the code is given at the corresponding section. A code can be inserted by pressing the Alt+1 key combination.
 Video
VideoThis button of the object inserting menu is used for adding a video into your message. The window shown in the screenshot below will appear, as soon as you press this button.

There are two options in the window: "Insert HTML code" and "Upload video in *.FLV format". The first one is intended for inserting videos from YouTube, Google Video, RuTube, MQL4.community, TeamWox or MetaQuotes Support Center. To do it one should insert the code of the video copied from the corresponding resource. The "Upload video in *.FLV format" option is intended for uploading the corresponding video files. In order to choose a file, one should press the "Browse" button.
To finish the adding of the video you should press the "Insert" button. If you want to cancel adding the video, you should press the "Cancel" button. The example of inserting the video is given at the corresponding section.
A video can also be inserted by pressing the Alt+2 key combination.
 Audio
Audio
The button of the object inserting menu is intended for adding audio files to the message body. The following window will appear as soon as you press it:

In order to choose a file you should click on the "click to select audio file" inscription, the standard window of choosing the files will appear then. Once you choose a file, it will be automatically uploaded in TeamWox. To finish the insertion you should press the "Insert" button.
Once you've inserted the file, the mini-player appears in the body of the message:

The name of the file and its size are specified there. If you put the mouse cursor over it, the volume control and the  button, using which you can download the file, appear to the right.
 Organization
The button of the object inserting menu allows to insert a link to organization that exists in the corresponding module into the text of the message. The list where you can choose the organization will appear as soon as you press it. Once you choose the organization the link to it will appear in the message text. If you put the mouse cursor over it the window containing a brief information about organization will appear:

There are several commands in this window, as well:
 — if you press the button, a call by the indicated number will be executed via softphone or Skype. Phone numbers are taken from organization's contact details.
- Email — if you press this button, you will be passed to the "E-Mail" module in the window of writing message. At the same time the address specified in the organization's contact details will be automatically substituted in the "To" field.
- Note — if you press this button, the window of adding a note to the organization's history will be opened.
A link to organization can also be inserted by pressing the Alt+4 key combination.

The button of the object inserting menu allows to insert a link to contact that exists in the corresponding module into the text of the message. The list where you can choose the contact will appear as soon as you press it. Once you choose the contact the link to it will appear in the message text. If you put the mouse cursor over it the window containing a brief information about contact will appear:

From this window you can make a call to this contact by pressing one of the corresponding buttons, or you can write a message at the address indicated in his/her contact details. If you press the "Note" button the window for adding notes to contact history will be opened.
A link to contact can also be inserted by pressing the Alt+5 key combination.
 Document
The button of the object inserting menu allows to insert a link to a document that exists in the corresponding module. The window where you can choose a document will appear as soon as you press it:

In this window all the documents available to you are shown in the form of a tree-structured list. You should choose one of them and press the "Insert" button. Once you do it a link to the specified document will appear in the text of message.
A link to document can also be inserted by pressing the Alt+6 key combination.
![]() Mindmap
Mindmap
This button is intended for inserting Mind Maps to the message body. Corresponding editor will be opened as soon as you press it. A mindmap can also be inserted by pressing the Alt+7 key combination.
![]() Chart
Chart
This button is intended for inserting charts to the message body. Corresponding editor will be opened as soon as you press it. A chart can also be inserted by pressing the Alt+8 key combination.
![]() Diagram
Diagram
This button is intended for inserting diagrams to the message body. Corresponding editor will be opened as soon as you press it. A diagram can also be inserted by pressing the Alt+9 key combination.
Style
The style field  (simple text by default) is intended for changing the text style. The list of available styles will open, as soon as you press the down-arrow button at the end of the field. The options are: normal text, header, quote, attention, code, strikeout, important, small. Example of manipulations with the styles.
 Bold
Bold
This button makes the selected text bold. The same action can be performed by pressing the Ctrl+B key combination.
 Underline
This button makes the selected text underlined. The same action can be performed by pressing the Ctrl+U key combination.
 Italic
This button makes the selected text italic. The same action can be performed by pressing the Ctrl+I key combination.
 Text color
This button changes the color of the font. In order to change the font color, you should press the down-arrow button located on the right side of the "Font color" button. The color-choosing window will appear, as soon as you press it. To choose the color you should click the square with the necessary color in this window.
 Text Background
This button changes the background color of your message. The choosing background color scheme is the same as font color changing described above.
 Text Direction
This button allows to change the direction of typing text in the message editor.
Text Alignment
The group of text alignment buttons contains the following ones:
 — align left. The same action can be performed by pressing the Ctrl+L key combination.
 — align center. The same action can be performed by pressing the Ctrl+E key combination.
 — align right. The same action can be performed by pressing the Ctrl+R key combination.
 — justify. The same action can be performed by pressing the Ctrl+J key combination.
In order to align the text, you should select the necessary part of it and press one of the four buttons.
![]() Remove Styles
Remove Styles
Once this button is press, all the appearance styling of text currently typed in the message editor will be removed.
![]() Templates
Templates
This button opens the menu for searching, creating, editing and pasting various templates in the message body.
![]() Clipboard
Clipboard
This button allows to save/paste/clear information in Clipboard.
Autosave
Automatic saving is performed after a certain amount of changes in a text has been made. Also the manual saving of the entered information is implemented in the message editor. In order to save a text you should press the  button. Once you do it, the following menu will appear:

The "Save the current text" (Ctrl+S) button allows to save all information that is in the message editor at the moment. The "Upload saved text" button allows to restore the last saved data. At that the date of the last saving is specified in brackets.
File Attachment
Maximum number of files that can be attached to a message is 32. |
Attachment of Common Files
In order to attach a file to your message, you should press the "Browse" button located in the lower part of the message editor window. A standard file-selecting window will appear, as soon as you press it. Once the necessary file has been selected, you should press the "Open" button.
Attachment of files using Drag'n'Drop
Any files can be added to your message by simple dragging them from the explorer to the area of attachments:

Attachment of Files from TeamWox
Files uploaded to the "Documents" module can also be attached to your messages. To do it, press the  button located to the right of the "Browse" button. The window where you should choose files will appear as soon as you press that button.

Select the files by double-clicking with the left mouse button on them. Selected files are displayed in the form of a list in the bottom part of the window. Press the "Select" button to attach the files to you message.
To delete an attached file, click the  button against it.
Attachment of Mind Maps
There is a possibility of creating Mind Maps and attaching them to your message. To do it you should press the  button, located to the right of the "Browse" button. The window of Mind Map Editor will appear as soon as you do it. The map can be edited after saving it, to do it you should press the
 ![]() edit button, located to the right of the attached map in the message editor. In order to delete the attached map you should press the button.
edit button, located to the right of the attached map in the message editor. In order to delete the attached map you should press the button.
Attachment of Charts
You can create a chart and attach it to a message. To do it you should press the  button located to the right of the "Browse" button. Once you press it the window of chart editor will be opened. In order to delete the already created chart from the message you should press the button.
Attachment of Diagrams
You can create a diagram and attach it to a message. To do it you should press the  button located to the right of the "Browse" button. The diagram editor will be opened as soon as you do it. The attached diagram can be edited after it has been saved. To do it you should press the
 ![]() edit button located to the right of it.
edit button located to the right of it.