The TeamWox groupware system contains the Chat module that will help you to bring your relationships with your customers to a new level.
Your clients will be saved from the necessity to wait for replies to their emails or to try to reach your customer support service by phone. This will help you quicker solve your clients' problems thus increasing their loyalty. Besides, the whole history of communications with your customers will be stored in a single information environment being available directly from TeamWox collaboration system. If necessity occurs, you will be able to easily find your discussions.
It is easy to launch this customer support service. So, why not start to use it right now?
Step 1. Creating a Service Group
You see the TeamWox Chat module.

First of all at least one Service Group should be created. Let's call it "Technical Support". To create a group the ![]() button should be pressed.
button should be pressed.
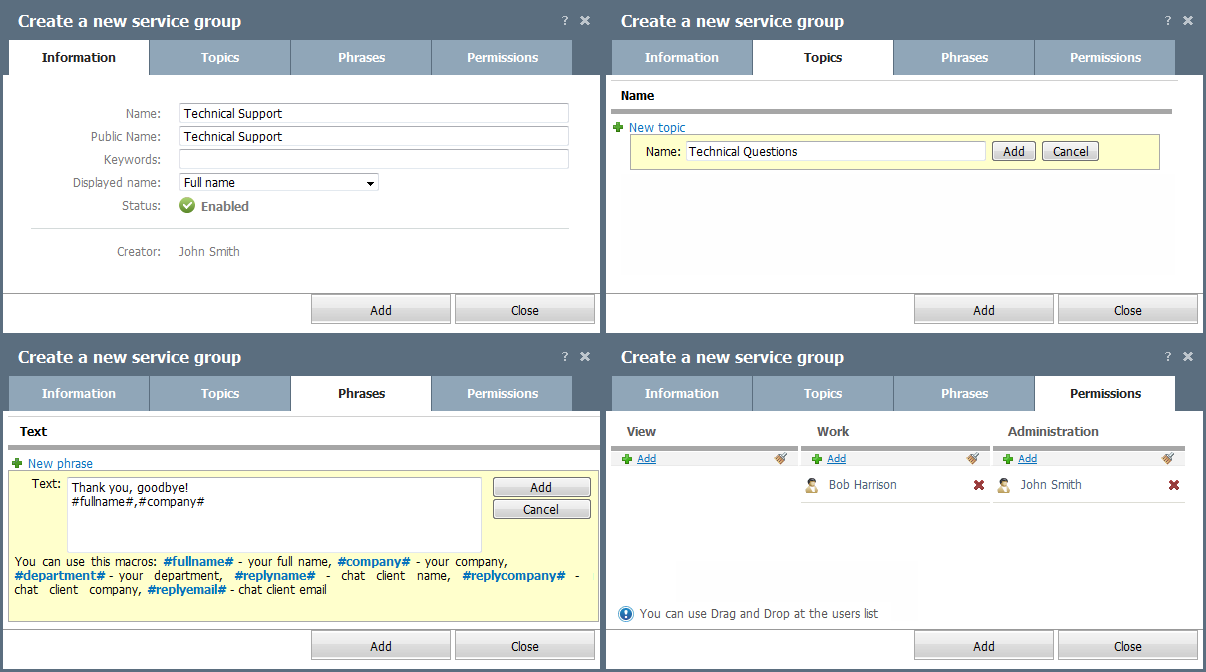
In the Information tab please pay attention to the following fields:
- Public name - group name that will be displayed on the website in the window where customers fill in their details for entering the Online Assistant;
- Keywords - this item is used for filtering references from different websites; it will be explained a little later;
- Displayed name - the form of displaying your employees' names during replies in their communications with clients.
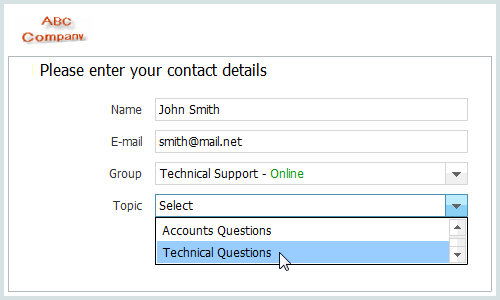
In the Topic field several discussion topics can be created within the given service group. Your customers will further select one of these topics when entering the Online Assistant:
In the Phrases tab you can prepare several standard phrases that are most frequently used in communications. The peculiarity of this feature is the possibility to use macros. In the Permissions tab set permissions for viewing dialogs and participating in them to your employees. After all the necessary settings are made, click the "Add" button.
Now comes the most difficult stage, as it may seem.
Step 2. Setting the Online Assistant on Your Website - Making a Customer Support Service
Two files - "support.html" and "support.swf" - should be located on your website. To download them, press the ![]() button in TeamWox collaboration software and go to Help topics: Chat -> Website Settings.
The beginning of the section contains the link "here (version dated
**.**.****)". Download the archive with files, unpack them and locate
in one of your website directories.
button in TeamWox collaboration software and go to Help topics: Chat -> Website Settings.
The beginning of the section contains the link "here (version dated
**.**.****)". Download the archive with files, unpack them and locate
in one of your website directories.
Setup of support.html
To set up the file open it for editing. The most important parameter of the file is url - it is responsible for the binding of your Online Assistant exactly to your TeamWox groupware. Change the address indicated in "url" in <param> and <embed> tags into the address of your TeamWox server:
<object classid="clsid:d27cdb6e-ae6d-11cf-96b8-444553540000"
   codebase="https://download.macromedia.com/pub/shockwave/cabs/flash/swflash.cab#version=9,0,0,0"
   width="100%" height="100%" id="main" align="middle">
  <param name="allowScriptAccess" value="sameDomain" />
  <param name="allowFullScreen" value="false" />
  <param name="movie" value="support.swf" />
  <param name="quality" value="high" />
  <param name="bgcolor" value="#FFFFFF" />
  <param name="flashvars"
   value="name=UserName&cache=true&logo=logo.png&url=https://team.yourdomain.com" />
  <embed src="support.swf"
   flashvars="name=UserName&cache=true&logo=logo.png&url=https://team.yourdomain.com"
   width="100%" height="100%" quality="high" bgcolor="#FFFFFF" name="main" align="middle"
   allowScriptAccess="sameDomain" allowFullScreen="false" type="application/x-shockwave-flash"
   pluginspage="http://www.macromedia.com/go/getflashplayer" />
</object>
In tags <param name="flashvars" value=".." /> and <embed flashvars=".." /> other parameters for setting up the Online Assistant can be specified:
name=[CLIENT'S NAME]
email=[CLIENT'S EMAIL]
phone=[CLIENT'S PHONE NUMBER]
company=[CLIENT'S COMPANY]
group=[GROUP NAME OF THE ONLINE ASSISTANCE]
The above named group of parameters sets predefined field values for customers. Names, email addresses, phone numbers and company names can be automatically filled in from the information about users registered on your website. If the service group name consists of two words and you wish to make its choice automatic at the attempt to enter the Assistant, instead of a space between words indicate "%20", for example: "technical%20support".
cache=true
If the "false" value is assigned to this parameter, cashing of data typed by a user when entering the Online Assistant will be disabled.
language=[LANGUAGE]
By default the language selected in the system is used. To select another language, indicate "ru", "en" or "cn" for Russian, English or Chinese respectively.
close=[NAME OF THE JAVASCRIPT FUNCTION THAT CLOSES THE WINDOW]
This parameter automatically closes the chat window when the "Complete" button is pressed.
logo=[PATH TO THE LOGO IMAGE FILE]
Requirements to the logo file: height - max. 36 pixels; format - *.jpg, *.gif, *.png, *.swf. If these requirements are not met, the standard TeamWox logo will be displayed.
-
filter=[KEYWORD]
This parameter is used to filter only necessary service groups according to keywords indicated in them. This allows to make available only specific service groups in chat windows called from different websites. In the "filter" parameter of the HTML file used on the website only one value can be indicated, while in group settings several values can be specified. Thus messages from different websites can be processed in one group.
Let's consider an example with two websites devoted to different products and one group providing customer support on them. In this case in the HTML file of the first website let's indicate the keyword "product1":
<object classid="clsid:d27cdb6e-ae6d-11cf-96b8-444553540000"
   codebase="https://download.macromedia.com/pub/shockwave/cabs/flash/swflash.cab#version=9,0,0,0"
   width="100%" height="100%" id="main" align="middle">
  <param name="allowScriptAccess" value="sameDomain" />
  <param name="allowFullScreen" value="false" />
  <param name="movie" value="support.swf" />
  <param name="quality" value="high" />
  <param name="bgcolor" value="#FFFFFF" />
  <param name="flashvars"
   value="name=UserName&cache=true&logo=logo.png&filter=product1&url=https://team.yourdomain.com" />
  <embed src="support.swf"
   flashvars="name=UserName&cache=true&logo=logo.png&filter=product1&url=https://team.yourdomain.com"
   width="100%" height="100%" quality="high" bgcolor="#FFFFFF" name="main" align="middle"
   allowScriptAccess="sameDomain" allowFullScreen="false" type="application/x-shockwave-flash"
   pluginspage="http://www.macromedia.com/go/getflashplayer" />
</object>
In the HTML file of the second website we will specify the keyword "product2":
<object classid="clsid:d27cdb6e-ae6d-11cf-96b8-444553540000"
   codebase="https://download.macromedia.com/pub/shockwave/cabs/flash/swflash.cab#version=9,0,0,0"
   width="100%" height="100%" id="main" align="middle">
  <param name="allowScriptAccess" value="sameDomain" />
  <param name="allowFullScreen" value="false" />
  <param name="movie" value="support.swf" />
  <param name="quality" value="high" />
  <param name="bgcolor" value="#FFFFFF" />
  <param name="flashvars"
   value="name=UserName&cache=true&logo=logo.png&filter=product2&url=https://team.yourdomain.com" />
  <embed src="support.swf"
   flashvars="name=UserName&cache=true&logo=logo.png&filter=product2&url=https://team.yourdomain.com"
   width="100%" height="100%" quality="high" bgcolor="#FFFFFF" name="main" align="middle"
   allowScriptAccess="sameDomain" allowFullScreen="false" type="application/x-shockwave-flash"
   pluginspage="http://www.macromedia.com/go/getflashplayer" />
</object>
In the service group settings both parameters separated by a comma should be specified in the "Keywords" field: product1, product2:
Now requests from both websites will be received by one service group.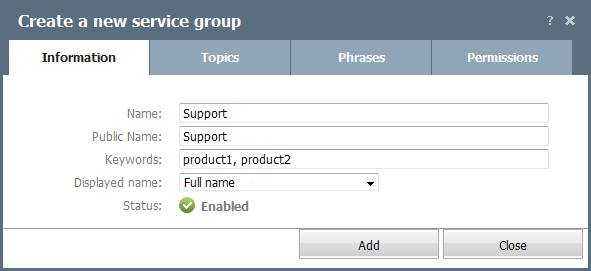
Now let's view another example, when we need to delimit access of different service groups for different websites. We have three versions of the website in different languages: English, Russian and Chinese. For the English and Russian versions there is a separate group "Support (en/ru)", and the special group "Support (cn)" is for the Chinese version. In the HTML file of the English version we indicate the keyword "en":
<object classid="clsid:d27cdb6e-ae6d-11cf-96b8-444553540000"
   codebase="https://download.macromedia.com/pub/shockwave/cabs/flash/swflash.cab#version=9,0,0,0"
   width="100%" height="100%" id="main" align="middle">
  <param name="allowScriptAccess" value="sameDomain" />
  <param name="allowFullScreen" value="false" />
  <param name="movie" value="support.swf" />
  <param name="quality" value="high" />
  <param name="bgcolor" value="#FFFFFF" />
  <param name="flashvars"
   value="name=UserName&cache=true&logo=logo.png&filter=en&url=https://team.yourdomain.com" />
  <embed src="support.swf"
   flashvars="name=UserName&cache=true&logo=logo.png&filter=en&url=https://team.yourdomain.com"
   width="100%" height="100%" quality="high" bgcolor="#FFFFFF" name="main" align="middle"
   allowScriptAccess="sameDomain" allowFullScreen="false" type="application/x-shockwave-flash"
   pluginspage="http://www.macromedia.com/go/getflashplayer" />
</object>
For the Chinese and Russian version indicate "cn" and "ru" respectively:
<object classid="clsid:d27cdb6e-ae6d-11cf-96b8-444553540000"
   codebase="https://download.macromedia.com/pub/shockwave/cabs/flash/swflash.cab#version=9,0,0,0"
   width="100%" height="100%" id="main" align="middle">
  <param name="allowScriptAccess" value="sameDomain" />
  <param name="allowFullScreen" value="false" />
  <param name="movie" value="support.swf" />
  <param name="quality" value="high" />
  <param name="bgcolor" value="#FFFFFF" />
  <param name="flashvars"
   value="name=UserName&cache=true&logo=logo.png&filter=cn&url=https://team.yourdomain.com" />
  <embed src="support.swf"
   flashvars="name=UserName&cache=true&logo=logo.png&filter=cn&url=https://team.yourdomain.com"
   width="100%" height="100%" quality="high" bgcolor="#FFFFFF" name="main" align="middle"
   allowScriptAccess="sameDomain" allowFullScreen="false" type="application/x-shockwave-flash"
   pluginspage="http://www.macromedia.com/go/getflashplayer" />
</object>
<object classid="clsid:d27cdb6e-ae6d-11cf-96b8-444553540000"
   codebase="https://download.macromedia.com/pub/shockwave/cabs/flash/swflash.cab#version=9,0,0,0"
   width="100%" height="100%" id="main" align="middle">
  <param name="allowScriptAccess" value="sameDomain" />
  <param name="allowFullScreen" value="false" />
  <param name="movie" value="support.swf" />
  <param name="quality" value="high" />
  <param name="bgcolor" value="#FFFFFF" />
  <param name="flashvars"
   value="name=UserName&cache=true&logo=logo.png&filter=ru&url=https://team.yourdomain.com" />
  <embed src="support.swf"
   flashvars="name=UserName&cache=true&logo=logo.png&filter=ru&url=https://team.yourdomain.com"
   width="100%" height="100%" quality="high" bgcolor="#FFFFFF" name="main" align="middle"
   allowScriptAccess="sameDomain" allowFullScreen="false" type="application/x-shockwave-flash"
   pluginspage="http://www.macromedia.com/go/getflashplayer" />
</object>
After that in the settings of the "Support (en/ru)" group we indicate keywords "en" and "ru" separated by a comma; for "Support (cn)" only "cn" is indicated:
In this case only corresponding service groups will be available to clients on the website.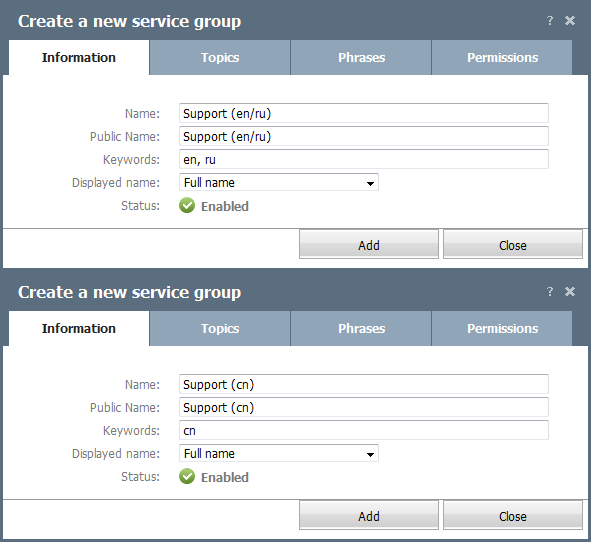
Each parameter should be separated by the & symbol.
Calling the Online Assistant File Window from Your Website Pages
In order to open the window of entering the Online Assistant, a link to the "support.html" file should be located in the code of the website page. For example:
<a href="javascript:void(0)" onclick="window.open('support.html','support','toolbar=no,resizable=yes,
status=no,menubar=no,location=no,width=600,height=500');">Online Assistant</a>
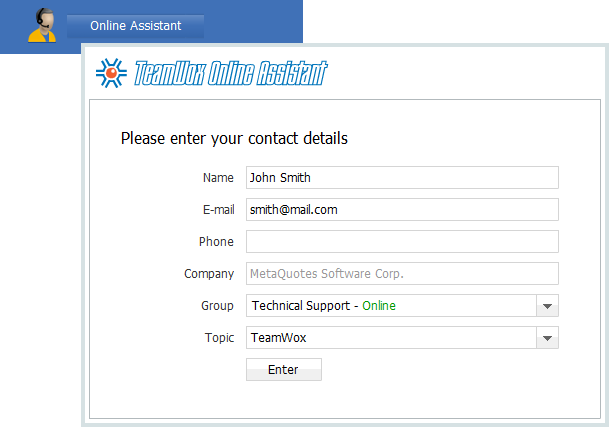
Now a click on this link opens a window for entering the Online Assistant offering to fill out a form.
Step 3. Setup in the Administration Module
Some parameters of the website dialog window can be set up via the Administration module in TeamWox collaboration system. Go to the "Modules" tab of this module, find "Chat" in the list and press the "Configure" button to the right of it.
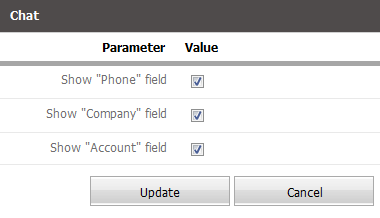
The following parameters can be indicated here:
Show Phone field - enables/disables the Phone filed in the form to be filled out.
Show Company field - enables/disables the Company filed in the form to be filled out.
Show Account field - enables/disables the Account filed in the form to be filled out.
Now your clients can contact your customer support service in the online mode, while your employees keep on working in the same environment - in TeamWox groupware.
Step 4. Checking the Operability
Here is an example of the source code for the Online Assistant:
<html style="height:100%;">
 <body style="background-color:red;margin:0px;">
   <object classid="clsid:d27cdb6e-ae6d-11cf-96b8-444553540000"
      codebase="https://download.macromedia.com/pub/shockwave/cabs/flash/swflash.cab#version=9,0,0,0"
      width="100%" height="100%" id="main" align="middle">
     <param name="allowScriptAccess" value="sameDomain" />
     <param name="allowFullScreen" value="false" />
     <param name="movie" value="support.swf" />
     <param name="quality" value="high" />
     <param name="bgcolor" value="#FFFFFF" />
     <param name="flashvars"
      value="name=UserName&cache=true&logo=logo.png&language=ru&url=https://abwww.teamwox.com/c" />
     <embed src="support.swf"
      flashvars="name=UserName&cache=true&logo=logo.png&language=ru&url=https://abwww.teamwox.com/c" width="500"
      height="300" quality="high" bgcolor="#FFFFFF" name="main" align="middle" allowScriptAccess="sameDomain"
      allowFullScreen="false" type="application/x-shockwave-flash"
      pluginspage="http://www.macromedia.com/go/getflashplayer" />
   </object>
 </body>
</html>
And here is the form of the window for entering the Online Assistant on our website www.teamow.com:
Some Peculiarities
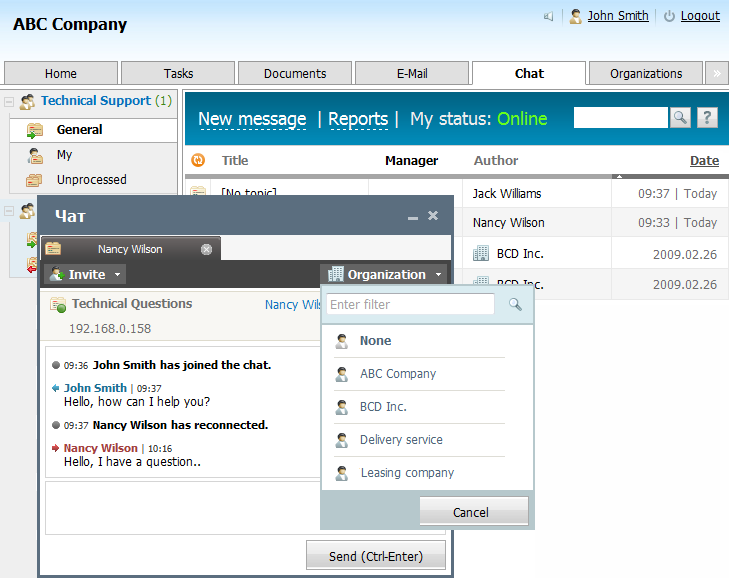
When requests are received in the Chat module, a client's email address is checked against email addresses of organizations and contacts listed in corresponding TeamWox modules. If matches are found, a dialog is automatically bound to an organization. Besides, the check is made by the website of an organization (verification by a client's mail server domain).
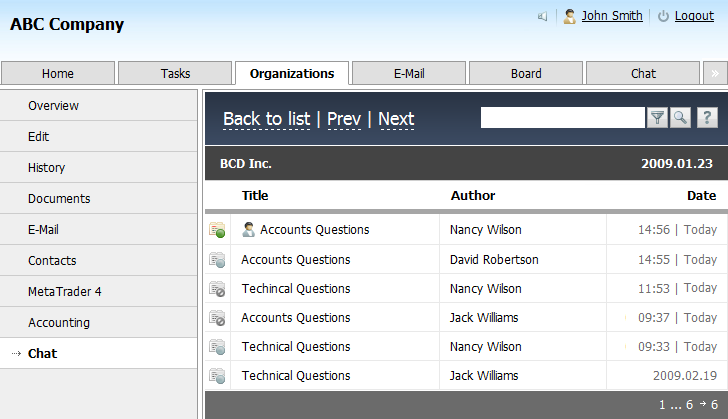
Dialogs bound to a certain organization will be displayed in a special tab. The whole history of communication with customers is stored in one environment and can be easily found.
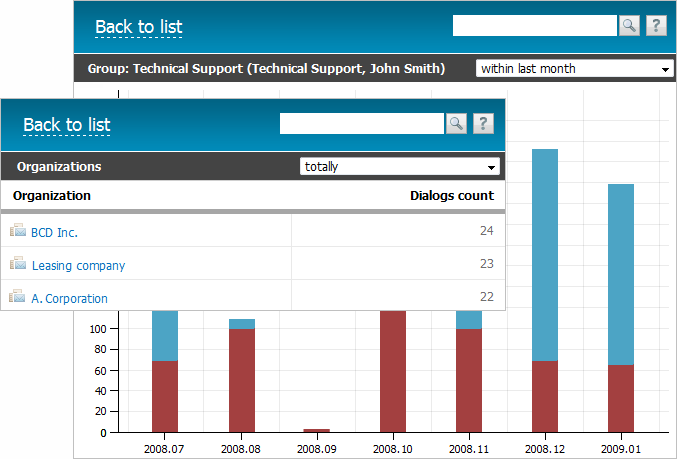
The Chat module also allows to automatically generate various reports: the summary report on all groups and on each group separately, the total number of dialogs, report on dialogs bound to organizations:
Conclusion
Many companies are trying to improve customer support services they render and increase the loyalty of their clients. With TeamWox collaborative software you get the possibility to achieve these goals absolutely free - the Chat module is included into any TeamWox Delivery Package. All you need to do is install TeamWox groupware.
Related articles:
- New Customer Support Tool - TeamWox Online Assistant (Live Chat)
- TeamWox Service Desk (Helpdesk): Customer Support Made Easy!
- FAQ
- TeamWox Help
- Terms of delivery of the TeamWox Collaboration Software
- Reviews and Feedback
2009.03.04