In this article you will find quick and easy steps on downloading, installing and using the TeamWox groupware server to meet the requirements of your business.
We offer you the trial version of the TeamWox collaboration software to be installed and used in your company absolutely free of charge. It is not limited by the
number of users or functionality, except for the trial period of 2 months. Upon completion of the period, you will be able to switch to another version with all your existing data remaining intact.
TeamWox collaboration system is a Web server application. For the operation of the groupware, we recommend using the latests versions of Web browsers: FireFox 3.5, IE 8, Chrome, Opera 10. Client access to the TeamWox collaboration system can be established from any computer working under any operating system (MS Windows, Linux, Mac OS, etc.).
Prior to install:
- If you do not have a distribution file, download it from Download page of this website.
Your computer must meet the following hardware requirements:
- Microsoft Windows 10 x64, Windows Server 2012 R2 or Windows Server 2016.
- 2 GHz Pentium 4 or higher;
- 4 GB RAM or higher;
- 100 Gb of free disk space (volume of HDD depends on the data stored in TeamWox during its operation).
- Microsoft Windows 10 x64, Windows Server 2012 R2 or Windows Server 2016.
- For the operation of the TeamWox server a valid domain is needed that will be used later for accessing the TeamWox collaboration system.
- For accessing TeamWox groupware from the Internet, you'll need your own public static IP address.
- To receive a license for the free TeamWox version, you will need the Internet connection. Besides, you'll need Internet to activate the installed TeamWox Web server.
- Since TeamWox collaboration system uses SSL technology, at least one local IP address must be unoccupied on the computer, where your TeamWox Web server will be installed.
- For the faultless operation of TeamWox collaboration software, the latest versions of Web browsers with installed Adobe Flash 9.0 and higher must be installed on clients' computers.
If your company doesn't have its own public IP address, and your are planning remote working with TeamWox groupware from the Internet, you'll have to contact your Internet provider requesting a public static IP address.
Reference:
DNS - (Domain Name System) - the system that automatically translates Internet addresses to the numeric machine addresses that computers use.
IP address (Internet Protocol Address) - a unique string of numbers separated by full stops that identifies each computer attached to the Internet.
Public static IP address - the permanent real IP address allocated by an Internet provider. The server is visible at this address from anywhere in the Internet, from any computer connected to the Internet.
Private Local IP - IP of a computer in a local network, can look like 192.168.x.x.
Domain name registration - adding information about a domain name and owner's details to the Global Registry.
A required condition for use of a domain name in the Internet is the delegation of a domain.
Functioning of a delegated domain is provided by servers of the DNS domain - firmware complexes that contain the necessary details of a domain and providing these details in compliance with the Internet technical requirements. DNS servers that are included into the global Internet DNS, are inter-connected and constantly exchange information to provide the successful translation of all addresses belonging to DNS on request of any computer connected to the Internet, wherever this computer may be located.
DNS is important for the operation of the Internet, because in order to connect to a node information about its IP address is required, and for a human it's more convenient to remember letter (usually notional) addresses, than the digits of an IP.
Hosting is a service that runs Internet servers, allowing organizations and
individuals to serve content to the Internet. There are various levels
of service and various kinds of services offered.
Hosts - a text file that contains the database of all domain names, used in translating them to the node network addresses. Call of this file in the operating system is of higher priority than referring to DNS servers. As distinct from DNS, file contents are controlled by the computer administrator.
Installation of the TeamWox Collaboration Software
Usually the installation of TemaWox Server takes a few minutes, if
preparations according to the above points have been made. However,
sometimes difficulties may occur. The purpose of this article is to
help you overcome such difficulties. So, let's consider the
installation process in details.
First open the installation file 'teamwoxsetup.exe'. By default, the installation system offers you to install the free version of TeamWox collaborative software. The license for it will be generated automatically (Internet connection is necessary). In case of any difficulties you can use the online customer support via Online Assistance.
Now let's see the stage of filling out data necessary for the generation of the TeamWox collaboration software's license. Please attentively fill out all the fields. In the "TeamWox domain" field indicate the domain name of your TeamWox server. This URL address will be used by the system users for accessing TeamWox groupware.
A domain name is the address of a Web resource (websites, mail servers, other services) in the Internet. All domain names in the Internet are unique. So, please be careful and attentive selecting the server name.
If you do not have your own domain name, we can provide a free-of-charge 3rd level domain, like youcompany.tmwox.ru in one of our domain zone.
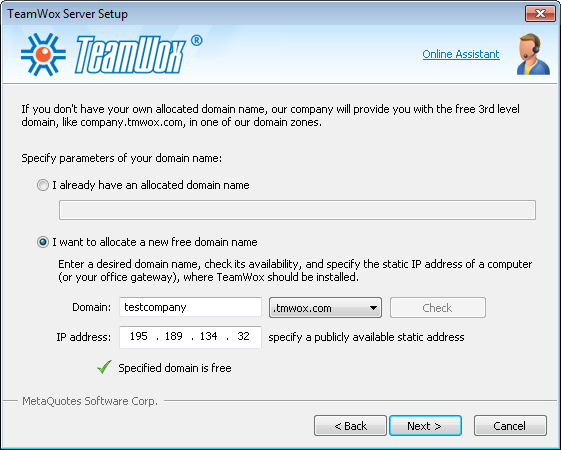
When selecting a new free domain name of your TeamWox groupware server, specify the sub-domain name and select of the three domain zones (tmwox.ru, tmwox.net, tmwox.com). We recommend specifying your company name for the sub-domain, e.g. testcompany. So, the full domain name of your TeamWox will be: testcompany.tmwox.com.
After you enter the sub-domain and select the domain zone, press "Check" to check whether this domain name is not occupied. If it is free, you can continue installation.
When checking the sub-domain, the installation program automatically defines your public IP address and shows it in the "IP address" field. It is impossible to define whether this IP address is your permanent static or dynamic one, you will be offered to edit this IP that will be required for implementing access to your collaboration software from the Internet.
If you are planning to use TeamWox groupware only inside your local network, without accessing it from the Internet, or if you currently do not have your own static public IP, then you may leave this field unchanged. Further, if the necessity occurs to open access to your collaboration software from the Internet, you will need to obtain a public static IP from your Internet provider, and then contact our customer support team to enter changes in the DNS entries of our domain zones and to re-generate a license for you.
If you already have your own second level domain www.yourcompany.com, we recommend using a domain like team.yourcompany.com or a similar one for your TeamWox collaboration software.
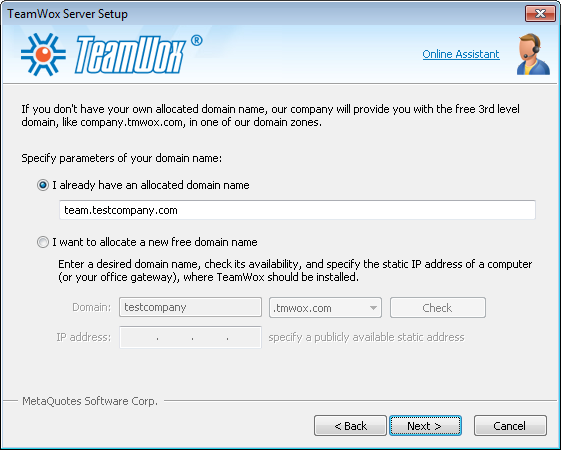
You may also use a closed intranet address, like team.yourcompany.local,
that will be available inside your corporate network only. To provide access to the TeamWox server at this address from the Internet, you will need to refer to your system administrator for setting up routing and port mapping.
If you do not have a corporate domain, you can buy and register a special domain, like myteam.com.
To register a new 2nd level domain, contact a special organization that registers domain names, for example www.godaddy.com.
During installation of the TeamWox Web server, some users select the name of a domain that already exists but does not belong to them (e.g. google.com or team.toyota.com) or select short names as one word localhost, team, webserver etc. In all these cases, you won't be able to access it from the Internet. You'll be able to work in the local network only, setting up every computer by adding entries to the hosts file or setting up the internal DNS server.
That is why we recommend using an address like team.yourcompany.com for the domain name of your TeamWox Web server.
A domain name is required for the installation of the TeamWox Web server, for the product activation and receipt of automatic updates. If the domain name is not specified, a software license cannot be generated.
A TeamWox license is generated and bound to the domain that you selected. That is why we strongly recommend using a unique domain name.
The installation program checks the indicated domain. If such a domain exists, a green tick appears near the field. If the invalid domain is specified, a red cross will remain. In such a case you will not be able to access TeamWox collaboration system via the Internet; it will be possible to use it only from your local network.
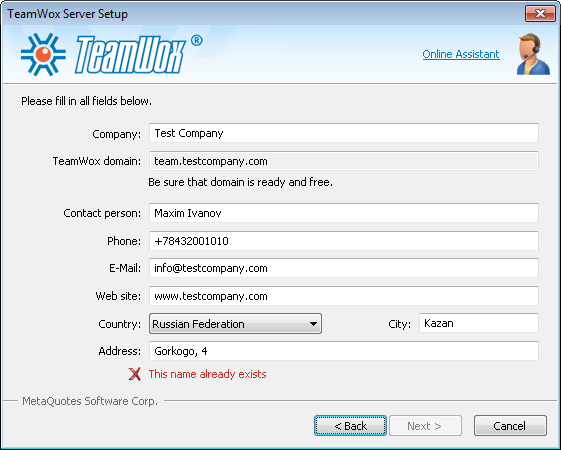
After that fill in the information necessary for the installation of TeamWox groupware on your server. Pay attention to the "IP address" field. Since TeamWox collaboration software uses the SSL technology, the SSL certificate is bound to a certain IP address with the unoccupied ports 443(https) and 80(http).
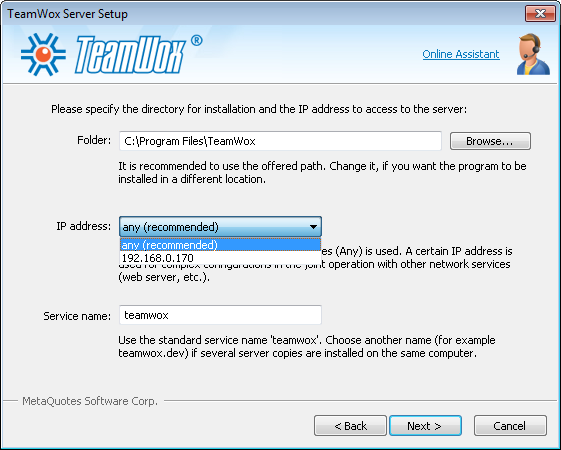
If you are not sure whether any programs using these ports are
installed on your computer, select the recommended variant "any". When
passing to the next stage, the system will check ports 443 and 80. If
they are occupied by other programs, you will be offered to select
another IP address.
You can select the IP address from the list and continue the installation pressing "Next".
In case ports 443 and 80 of all IP addresses are busy, you will
need to assign an additional IP address in Windows. This operation is
performed in "TCP/IP Protocol" settings of "Network Connections"
properties. Then repeat the installation.
If at domain entering the program detects that it does not exist, the following window will appear:
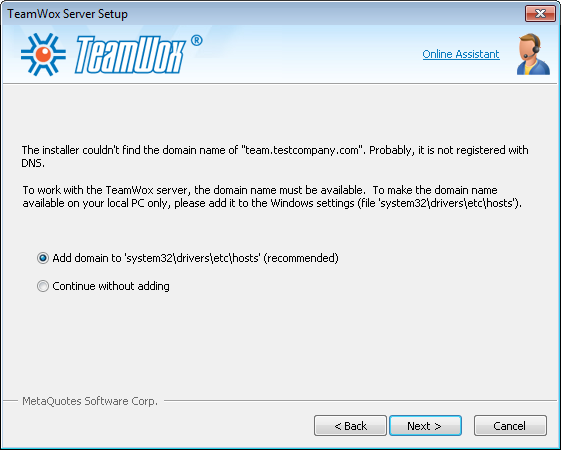
In such a case a record is added into 'hosts' file that assigns the corresponding domain name (team.testcompany.com) to the selected IP address. Now in the web browser of your server you will be able to access the TeamWox collaboration system at the URL address: https://team.testcompany.com.
In order to enable other computers from your local network to access the system, the same record must be added into 'hosts' file located at C:\WINDOWS\system32\drivers\etc. When selecting "Continue without adding domain name" the record is not added into 'hosts'. In such a case this may mean that a DNS server is installed in your company or your administrator solves this task in a different way.
A variant is possible, when the installation program checks the specified domain and displays a warning that this domain does not correspond to IP. In such a case you will not be able to access the TeamWox server at the indicated address https://microsoft.com. In this situation, in order to get the local access from the server web-browser (computer where TeamWox Web server is installed) you should add the record assigning this domain name to your IP address into 'hosts' file.
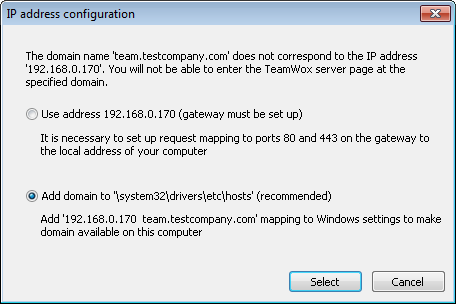
Example of an entry in 'hosts' file:
# for TeamWox
192.168.0.138 testcompany.tmwox.com
When an IP is selected on the previous step, you will be offered to add an entry the following kind to the local hosts file:
# for TeamWox
127.0.0.1 testcompany.tmwox.com
In this case, in order to provide access from other computers in your local network, you'll need to add the corresponding entry to the hosts file on every computer (for our example):
192.168.0.138 is a local IP address of a computer where the TeamWox Web server is installed. To get to know this IP, execute command ipconfig. In the command line (Start -> Run -> Open) enter command: cmd and then execute ipconfig in the appeared window. One of the command results will be your computer's IP.192.168.0.138 testcompany.tmwox.com, where
On the next stage fill in the information about the TeamWox server administrator. Please be attentive selecting Login and Password and remember them!
After that the installation program copies TeamWox files into the selected directory of your server and performs necessary setups.
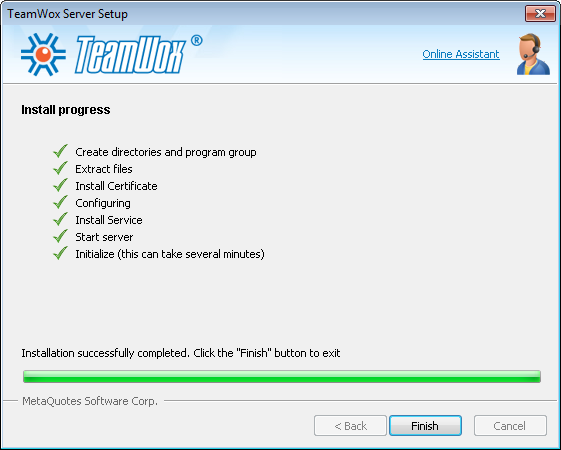
The installation of the TeamWox server is completed. After that the web-browser is automatically started and an attempt is made to connect to TeamWox collaboration system.
First Login
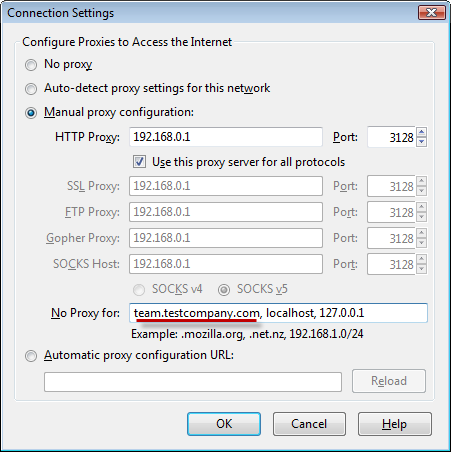
If your organization uses a proxy-server for the internet
connection, indicate your domain (team.testcompany.com) in the "Do not
use proxy servers for addresses beginning with" field of the "Network"
section in the web-browser.
For Windows Internet Explorer: Tools - Internet Options - Connections - LAN Settings - Advanced - Exceptions:
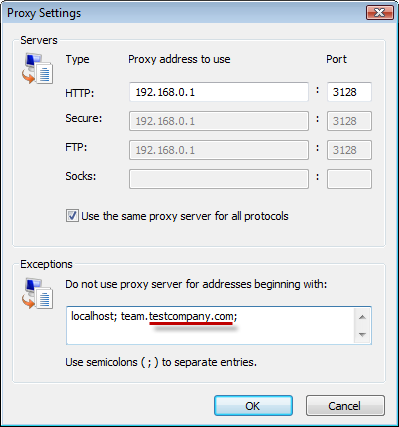
For Mozilla Firefox: Tools - Options - Advanced - Network - Settings - No Proxy for:
By default the TeamWox server uses the SSL certificate issued by the unauthorized certification center MetaQuotes Software CA. This certificate has a serious disadvantage - web-browsers do not trust it and generate warning messages.
Depending on the default web-browser used by your operating system, after the first login you will get a warning of SSL security about the error during secure connection establishment with your domain because of the invalid security certificate used. In such a case an exception should be added for your domain or the root certificate from MetaQuotes Software CA should be installed (MetaQuotesRootCA.cer).
The SSL certificate should be added into the web-browser of each user. Further it is recommended to substitute the certificate from MetaQuotes Software CA by your own SSL certificate. Read How to Get a Legal SSL Certificate for TeamWox.
Please note that you are accessing your TeamWox collaboration system through a secured version of HTTP protocol using SSL (Secured Socket Layer). If you successfully enter the TeamWox groupware, you are offered to indicate administrator login and password created during system installation.
Congratulations! You have successfully logged in to your TeamWox collaboration software.
First Steps in TeamWox Groupware Setup
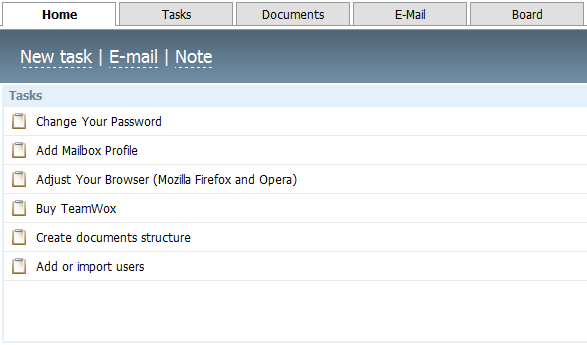
Once you access your TeamWox collaboration software, you will see different default modules, such as: Home, Tasks, Documents, Email, etc. If you should require any help in getting started with the product, TeamWox groupware provides the user with some initial useful start-up instructions (guidelines). Click on the "Home" module to see all available instructions which appear on the Task Manager module, such as: how to change your account password, how to add or import users, how to create document structure, how to adjust your browser, how to add your mailbox profile and so on.
Learn to use the built in Help system that contains the detailed information on the whole system.
To view Help files, click on the "Help" - ![]() button located in the upper right corner of all tabs except for Home.
button located in the upper right corner of all tabs except for Home.
In order to activate and set your TeamWox Server, go to the Administration Module. This module is designed for TeamWox server administration and is used by the administrator only. All the system management issues are gathered here.
The following tabs are located to the left:
- Overview - system and license information.
- Connection- information about the network connection.
- Settings - TeamWox system settings.
- Security - security settings. Password parameters, account bindings, etc.
- Backup - backup of information.
- Groups - adding, editing, deleting groups, assigning of access rights.
- Users - adding, editing, deleting users, assigning the rights to access to modules.
- Modules - administering modules and managing updates of TeamWox.
- Sounds - setup sound notifications of system events
- Requests - page from which one can directly communicate with the system developers via requests.
- Journal - monitoring TeamWox events.
- Statistics - statistics of TeamWox resources usage.
Visit all sections to set up the TeamWox server for all your company employees' work.
Expressly for you we have prepared the TeamWox Implementation Guide and the Brief Training Course. Using this materials will even more simplify the process of arranging the work in TeamWox system at your company.
Here are some extra features in the operation of TeamWox collaboration system:
- If in your company the internet connection is implemented via a proxy server, gateway, router, etc., you should set up the remote access routes from the internet. Usually it is enough to add corresponding mapping records about the used internal IP addresses, protocols (https and http) and ports (443 and 80) in the firewall settings.
- For the faster operation from the local network, you can add your
domain (team.testcompany.com) in the "Do not use proxy server for
addresses" field of the "Network" section in your web browser settings.
This variant can be used when your own DNS server redirecting the public IP address into the local one is used in your local network. For example, the public IP address of team.testcompany.com = 205.134.70.31, but the computer with the TeamWox collaboration server is behind the firewall in a local network with the IP address 192.168.0.152.
In such a case you should add a record like 'team.testcompany.com = 192.168.0.152' in the firewall or internal DNS server, so that your employees could connect directly without using routs via public addresses or proxy servers.
You can also use FAQ: TeamWox collaboration server installation.
Shall you meet any difficulties, have questions or suggestions, please contact our customer support service.
You can do it the following way:
- using the online customer support service of MetaQuotes Software Corp. in the Administration module (the Overview tab). A click on the corresponding button will open the window with the special application form. By pressing Enter you will be connected with the online customer support group;
- using the Forum on www.teamwox.com.
We would be delighted to have your feedback during your evaluation and use of the product. Your opinion and feedback is extremely important for us, and we are open to any suggestions, questions, and ideas that you may have in order to improve the product. During the testing period, we are always happy to provide you with interactive support about the collaboration software product. In addition, we can arrange a full interactive presentation of TeamWox collaboration system for you at a convenient time, as well as helping you to setup the groupware from scratch.
We will be happy to help you and answer all your questions from Monday till Friday 9:30 - 18:30 (GMT+3).
Related articles:
- TeamWox Groupware Setup Guide and Brief Training Course
- FAQ
- Setting up the access to the TeamWox Collaboration System from the Internet
- A Legal SSL Certificate for TeamWox Collaboration System
- How to speed up TeamWox Groupware by storing components on different drives
- How to Install TeamWox Business Communicator on your PC
- Migration from OTRS Ticket System to the TeamWox Business Management Software
- Technical Customer Support with TeamViewer
- TeamWox Help
- Terms of delivery of the TeamWox Collaboration Software
- Reviews and Feedback
2009.07.28