Introduction
You've probably noticed that all modules from standard TeamWox delivery share the same style of user interface. All modules have similar controls, that eventually develop a sense of system integrity.
From the previous articles you've already got some experience of developing custom modules. In this article we will talk about how to properly configure the environment of custom modules for their further distribution. As an example we will use the Hello World training module.
In particular, you will learn how to use the structure with information about the module, how templates and resource files are processed, how to create help files, how to add commands on the main page. In the second part we will talk about widgets and the Tips system module.
1. Setting Up the Environment
1.1. Getting Information About Module
1.2. Getting Module Interface
2. Resources and Templates
2.1. Resources
2.2. Templates
3. Help Files
3.1. Files and Folders Structure
3.2. Topics and Pages Order
4. Integration of User Commands in TeamWox Modules
4.1. User Commands in TeamWox Main Page Header
4.2. Downloading Module Scripts in Topmost Frame
1. Setting Up the Environment
DLL of every TeamWox module must always export the following methods:
- ModuleGetInfo(int index, ModuleInfo *info). This method retrieves information about the module by filling out the ModuleInfo structure. This information will be used, when the new module is added and registered in TeamWox.
- ModuleGetInterface(int id, int server_api_version, IModule **module). This method returns the IModule interface, in order for server to communicate with the module.
1.1. Getting Information About Module
The ModuleInfo structure
Let's consider this structure, containing all the necessary information about a module.
|
Field |
Type |
Description |
|---|---|---|
|
id |
int |
Unique identifier of the module. The first 65535 digits are reserved for modules from TeamWox standard delivery. Custom modules must have IDs greater than 65535. |
|
version |
int |
Module version. The integer value will be displayed as floating point number rounded up to two decimal digits. For example, number 100 will be displayed as 1.00. |
|
build |
int |
Module build number. An important parameter that allows you to perform various checks (like we did in the TeamWox SDK: Interaction with DBMS article). With every new module build developers have to increment this parameter. |
| build_date |
wchar_t[16]
|
Date of module build. Informational line. |
|
version_api |
unsigned int |
TeamWox API version, using which the module has been compiled. Checked in the ModuleGetInterface method against the current version of server API. If TeamWox API version, used to compile the module, is greater (newer) than the server version - the module simply won't be loaded. |
| name |
wchar_t[64]
|
Short name of the module, that is used in HTTP requests. May contain only Latin characters and underscores. |
| dependences |
int[32] | List of modules required for this module. DEPRECATED, functionality is implemented in the IModule::PostInitialize method. |
| color |
wchar_t[7]
|
Color of page header gradient fill (6 characters, zero). DEPRECATED, functionality is implemented in templates. |
|
flags |
int |
Flags of module description. Provided by the EnModuleFlags enumeration (for details see below). |
| icon_url |
wchar_t[260]
|
Path to module icon, that is displayed on the Management -> Modules page. |
| home_site |
wchar_t[260]
|
Link to the the module manufacturer's website. |
| reserved |
char[256]
|
Reserved field. |
The id, name, icon_url, home_site and reserved fields generally do not change during module development and are set only once. When module is developed, most actively changing are the build and build_date fields, and periodically the version_api filed - when new version of TeamWox server (and TeamWox API, respectively) is released.
For the Hello World module the ModuleInfo structure is filled out in the CHelloWorldModule::InfoGet(ModuleInfo *info) method.
ModuleInfo module_info=
 {
  HELLOWORLD_MODULE_ID,                                    // HELLOWORLD_MODULE_ID = 65536
  ProgramVersion,                                          // #define ProgramVersion   100
  ProgramBuild,                                            // #define ProgramBuild     100
  ProgramBuildDate,                                        // #define ProgramBuildDate L"12 Oct 2008"
  TEAMWOX_API_VERSION,                                     // #define TEAMWOX_API_VERSION 76
  L"helloworld",                                           //
  {0},                                                     //
  L"",                                                     //
  TW_MODULE_FLAG_DIGITAL_SIGN | TW_MODULE_FLAG_MODULE_TAB, // Module is digitally signed by TeamWox developers
                                                           // and has its tab on the main page
  L"/helloworld/res/i/logo.gif",                           // Module logo
  L"https://www.teamwox.com/"                               //
 };
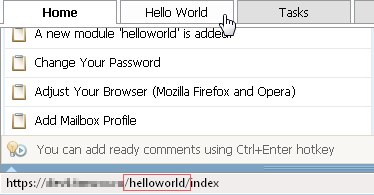
Module name (the name filed) is used to generate path in HTTP request line.
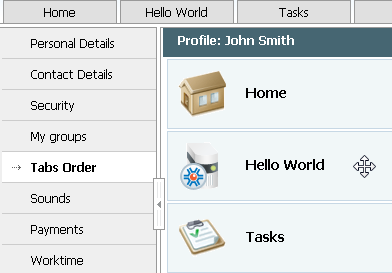
Module logo is displayed when module is turned on in the Administration module on the Modules tab,

as well as in the user profile on the Tabs Order tab.
The EnModuleFlags Enumeration
Flags from this enumeration directly affect how the module is displayed in user interface.
|
Name |
Value |
Description |
|---|---|---|
|
TW_MODULE_FLAG_LEFTPAGE |
0x01 |
Indicates the left panel. If the flag is set, the module page will display the left panel, and a Web browser will sends HTTP request like /module_name/left (for more info see below). |
|
TW_MODULE_FLAG_DIGITAL_SIGN |
0x02 |
Module protection with digital signature. If the flag is set, it indicates that module is certified by TeamWox developers (just like modules from standard delivery). |
|
TW_MODULE_FLAG_MODULE_TAB |
0x04 |
Displays the module tab on TeamWox main page. |
|
TW_MODULE_FLAG_HIDDEN |
0x08 |
Module has no visual part, i.e. it integrates with other modules (for example, the Reports module). |
|
TW_MODULE_FLAG_MANUAL_CHECK |
0x10 |
Disable automatic verification of module permissions. If the flag is not set (default) and module is disabled, the server won't send requests. If the flag is set, then requests will be sent in any case (such as in the Reports module). |
1.2. Getting Module Interfaces
Now, once we've got module information, we need to get module interfaces. Every module class, in order to work in system, must implement the IModule interface. This is the main interface, that is used by server to communicate with module.
Module methods, inherited from the IModule interface, are called by TeamWox server in a certain order.
1. Initialization - Initialize(class IServer *server, int prev_build). Only server's and server modules' interfaces can be called. To ensure system works correctly, at this stage there is no interaction with other modules.
2. Post initialization - PostInitialize(). All modules are loaded, and now other modules' interfaces can be called.
3. Working with the system. This is the main stage, when users interact with the server.
-
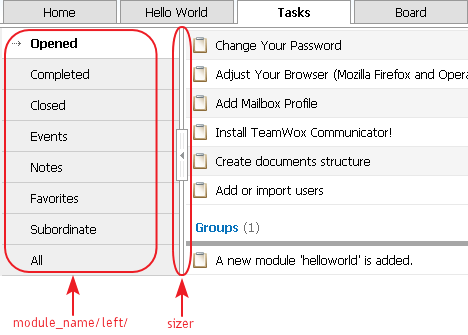
Processing request - Process(const Context *context). For any module in TeamWox system there are two reserved URL parts, that are recommended to use in HTTP requests:
- /module_name/index - Redirecting to the main page of the module.
- /module_name/left - Displaying the left panel. This type of request creates the additional frame (with separator) in user interface of a module. This frame will which display the result of this request. In user interface of the left pane, you can apply any controls, but it is recommended to use the List control - this one is used in modules from standard TeamWox delivery.
- Listing the necessary interfaces - GetInterface(const wchar_t *name, void **iface). This method must return interfaces, provided and implemented by module.
4. Deinitialization - PrepareDestroy(). Server stops all processing, preparing to end working.
5. Free resources - Release(). Ending work on server shutdown or reboot.
In addition to these main methods, the IModule interface provides several auxiliary methods, that can help you get additional information about the module,

as well as to manage module permissions.

2. Resources and Templates
In addition to the compiled source code in form of DLL, module also includes resources (online help, images, scripts, stylesheets, etc.), as well as page templates that define user interface.
2.1. Resources
For every custom module you must configure access to its resources. Processing HTTP requests for static resource files is implemented directly in the server. So there is no need to implement it for every module individually. TeamWox server provides efficient processing of requests for static files - it caches them in memory for quick access.
In order for server to process HTTP requests for resources, on the first stage of module initialization (IModule::Initialize) it must register the URL and the path to files using the IServer::VirtualPathRegister method.
VirtualPathRegister(const wchar_t *path_virtual, const wchar_t *path_real,int flags)
|
Параметр |
Type |
Description |
|---|---|---|
| path_virtual |
wchar_t* |
URL prefix for resource files processing. This path will be processed by the server. |
| path_real |
wchar_t* |
Path to resource file or folder with resource files, relative to the folder (on the server) with module DLL. |
|
flags |
int |
Flags of the EnVirtualFoldersFlags enumeration. |
Thus, we bind the actual location of resources with the text of HTTP request line. For the Hello World module registering virtual paths looks as follows.
//--- Mapping folders with static content - images, scripts
  m_server->VirtualPathRegister(L"/res",   L"res",    TW_VIRTUAL_FOLDER_FLAG_CACHE);
//---     JavaScript may contain translation - the TW_VIRTUAL_FOLDER_FLAG_LANGS flag
  m_server->VirtualPathRegister(L"/res/js",L"res\\js",TW_VIRTUAL_FOLDER_FLAG_CACHE | TW_VIRTUAL_FOLDER_FLAG_LANGS);
Now, lets consider the flags that can be set for resources.
EnVirtualFoldersFlags
|
Name |
Value |
Description |
|---|---|---|
|
TW_VIRTUAL_FOLDER_FLAG_CACHE |
0x001 |
The response from server includes the Expires HTTP header, that tells browser to cache file until the expiration date. So when you reload a page, browser won't send request to the server. |
|
TW_VIRTUAL_FOLDER_FLAG_NOCACHE |
0x002 |
The HTTP response includes the Expires header with known past date, so that files are not cached (several flags flags are set in order not to cache data). |
|
TW_VIRTUAL_FOLDER_FLAG_DYNAMIC |
0x004 |
The HTTP response includes the Last-Modified header, and HTTP request includes the If-Modified-Since header. Setting this flag allows you to implement a so-called dynamic caching. |
|
TW_VIRTUAL_FOLDER_FLAG_LANGS |
0x008 |
File may contain <lng:> tokens for translations substitution. Such files are processed by system translations module. |
|
TW_VIRTUAL_FOLDER_NOT_SECURE |
0x010 |
Files can be sent when requested via insecure HTTP protocol. Note: Don't worry about potential DDoS attacks. For such requests the public part simply won't respond, and this will not affect the system performance. |
|
TW_VIRTUAL_FOLDER_NOT_AUTHORIZE |
0x020 |
Allow to process HTTP requests from unauthorized users. |
|
TW_VIRTUAL_FOLDER_PUBLIC |
0x040 |
Makes resource available for unauthorized users in public requests. |
|
TW_VIRTUAL_FOLDER_SEND_ATTACHMENT |
0x080 |
If the flag is set for an individual file or for an entire folder, the HTTP response header includes the Content-Disposition: attachment header. Thus, a download dialog box will always pop up for submitted files, regardless of the MIME-type. |
The most commonly used are the TW_VIRTUAL_FOLDER_FLAG_CACHE flag - to reduce the server load, and the TW_VIRTUAL_FOLDER_FLAG_LANGS flag - to provide multilingual support.
2.2. Templates
Now let's talk about templates. From the previous articles you've already known that template files define the user interface of pages. Template files should reside in a folder relative to the module DLL. For convenience, the template files are grouped in the \templates subfolder and have the *.tpl extension.
For example, when you call the IServer::PageProcess method, that processes template for the PageIndex page, specify the following relative path as the second parameter:
return(server->PageProcess(context, L"templates\\index.tpl", this, TW_PAGEPROCESS_NOCACHE));
3. Help Files
Reference documentation is sine qua non for every high-quality software. In addition, it simplifies the technical support. In TeamWox groupware context sensitive help is displayed by the Help system module (TWX_HELP).
This module initially has the ability to display online documentation in all languages supported in TeamWox (depends on language settings in user profile).
English is the obligatory language for module's online help. It will be used by default if user interface language doesn't have an appropriate translation of reference documentation.
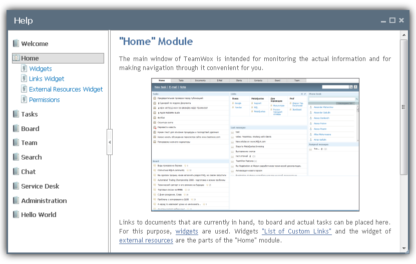
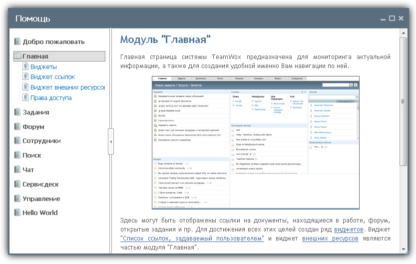
Help for a particular module is displayed using the corresponding button in page header.

You've already learned, that page header is created using the PageHeader control, and the Help button - using its method Help. The Help method parameter is specified in the following format:
module_name/html_file_name
For the Hello World module main page, it looks as follows:
//+----------------------------------------------+
//| Page Header with commands                    |
//+----------------------------------------------+
var header = TeamWox.Control("PageHeader","#41633C")
             .Command("<lngj:MENU_HELLOWORLD_NUMBER1>","/helloworld/number_one","<lngj:MENU_HELLOWORLD_NUMBER1>")
             .Command("<lngj:MENU_HELLOWORLD_NUMBER2>","/helloworld/number_two","<lngj:MENU_HELLOWORLD_NUMBER2>")
             .Command("<lngj:MENU_HELLOWORLD_REPORTS>","/reports/helloworld/helloworld_report","<lngj:MENU_HELLOWORLD_REPORTS>")
             .Help("helloworld/index")
             .Search(65536);
3.1. Files and Folders Structure
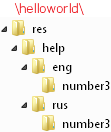
Help files are common HTML documents with images and styles, i.e. they refer to module resources. To display help files in the "Help" module, module developers have to create folder structure in the following format.
module_name\resources_folder\help\language\
- resources_folder - Registered using the IServer::VirtualPathRegister method (see above).
- help - Reserved name for the folder, processed by the "Help" module.
- language - Three-letter name of the folder, that corresponds to the language code. Language code (e.g. eng, rus, fra, ger, spa, etc.) is also used in translation files (*.lng).
For example, folder structure for the Hello World module looks as follows.

Accordingly, for each module page the PageNumerator control's parameter will look as follows.
helloworld\html_file_name
or
helloworld\subfolder_name\html_file_name
For more information about creating subtopics, see below.
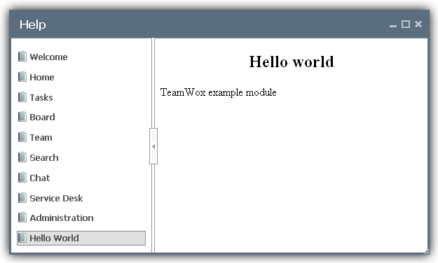
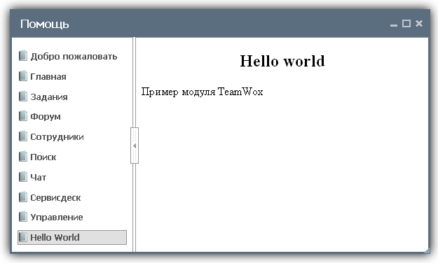
No doubt that names of files and folders as well as their structure inside the language folder should be completely equal - only contents should differ. For the Hello World module, when you click the ![]() button in main page header, the "Help" module opens the index.html file in Russian or in English.
button in main page header, the "Help" module opens the index.html file in Russian or in English.
3.2. Topics and Pages Order
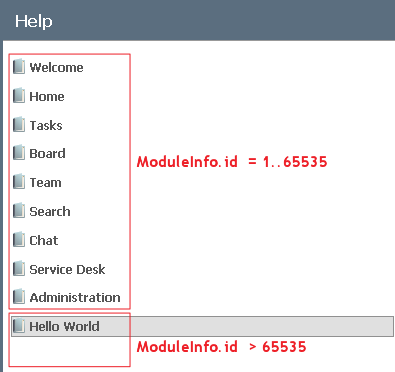
The order of root topics in the "Help" module is based on modules IDs - from smaller to larger. Since custom modules IDs should start from 65536 (65535 - is the ID of the Administration module), help topics for custom modules will be located at the end of the list in the "Help" module's left panel.
The internal structure of pages in the help module is defined otherwise. In the source code of HTML pages, in the <head></head> tag you have to add the following meta data:
<meta content="order:n" />
The value of n from smaller to larger determines the order of pages. The least n corresponds to the root topic page.
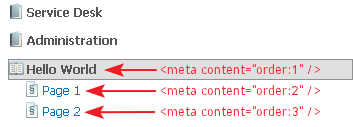
To create a subtopic, simply create a subfolder like this.
module_name\resources_folder\help\language\folder
Then in this folder, inside HTML documents source code just continue the numbering of n in the <meta content=\"order:n\" /> tag. Remember, that pages of root topic and all subtopics should be named as index.html.
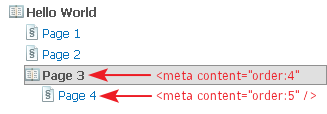
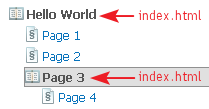
Accordingly, the updated structure of files and folders will look as follows.


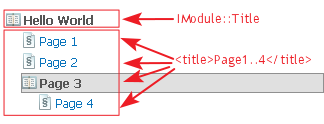
The root topic name is displayed using the IModule::Title method. Names of subtopics and pages are displayed using the <title></title> tag value, specified in HTML source code.
When you edit the names of help topics, the changes will take effect only after server restart.
4. Integration of User Commands in TeamWox Modules
In the last section we will consider how to make custom modules' commands (in form of JavaScript functions) available from other TeamWox modules. JavaScript commands can be run in a separate window (using the Window control), or in the main browser window.
This task can be solved in two ways.
- The IToolbar interface. Using it you can add custom commands to the TeamWox main page header.
- The IModuleMainframeTopBar interface. Using it you can load custom scripts in topmost frame for subsequent use in other modules.
Let's consider the implementation of this functionality using the Hello World module as an example (source codes with all the changes are attached to this article).
4.1. User Commands in TeamWox Main Page Header
The IToolbar interface provides several methods that are called by the server, when rendering TeamWox main page header. The server also determines the order of calling these methods.
- Total(void) - Returns the total number of custom module commands to be displayed in page header.
- InfoGet(int toolbar_num, ToolbarInfo *info) - Gets information about commands.
- IsAccessible(const Context *context, int toolbar_num) - In this method, you can implement checking permissions for certain commands.
- ProcessHeader(const Context *context) - Outputs additional code, that loads the JavaScript file with a user-defined function.
The list of custom module commands, that you want to display in TeamWox main page header, is set in the ToolbarInfo structure.
|
Field |
Type |
Description |
|---|---|---|
| title |
wchar_t[64] |
Key of command name translation (text of link). |
| description |
wchar_t[128] |
Key of command description translation (tooltip). |
| url |
wchar_t[128] |
Command URL. |
As an example, we will add a simple JavaScript function, that displays a message box. File with function code should reside in the Hello World module resources (\modules\helloworld\res\js\helloworld.js).
function HelloWorld_Command()
   {
     alert("<lngj:HELLOWORLD_COMMAND />!!!");
   }
4.1.1. List the IToolbar interface in CHelloWorldModule::GetInterface.
//---
   if(StringCompareExactly(L"IToolbar",name))
     {
       *iface = &m_toolbar;
       return(RES_S_OK);
     }
4.1.2. For convenience let's implement this interface in the separate class (manager).
#include "Managers\HelloWorldToolbar.h"
private:
   IServer          *m_server;
   CHelloWorldManager m_manager;
   CHelloWorldToolbar m_toolbar;
4.1.3. Description of the CHelloWorldToolbar class.
//+------------------------------------------------------------------+
//| Main menu commands                                               |
//+------------------------------------------------------------------+
class CHelloWorldToolbar : public IToolbar
    {
private:
    static ToolbarInfo m_toolbar[];
    //---
    IServer         *m_server;

public:
                    CHelloWorldToolbar();
                   ~CHelloWorldToolbar();
    //---
    TWRESULT        Initialize(IServer *server);
    //---
    int             Total(void);
    TWRESULT        InfoGet(int toolbar_num,ToolbarInfo *info);
    TWRESULT        IsAccessible(const Context *context,int toolbar_num);
    TWRESULT        ProcessHeader(const Context *context);
    };
In addition to the four methods inherited from the IToolbar interface, declare method of initialization. You can use it to initialize custom commands manager in the main page header during module initialization (CHelloWorldModule::Initialize).
//---
   if(RES_FAILED(res=m_toolbar.Initialize(m_server)))     ReturnErrorExt(res,NULL,"failed to initialize main page toolbar");
4.1.4. Implementation of the CHelloWorldToolbar class.
- Fill out the ToolbarInfo structure by adding command, that calls the HelloWorld_Command() custom function from module resources. Don't forget to add translations for new keys in helloworld.lng language file.
//+------------------------------------------------------------------+
//|                                                          TeamWox |
//|                   Copyright 2006-2011, MetaQuotes Software Corp. |
//|                                        https://www.metaquotes.net |
//+------------------------------------------------------------------+
#include "StdAfx.h"
#include "HelloWorldToolbar.h"
//--- List of commands
ToolbarInfo CHelloWorldToolbar::m_toolbar[] = {
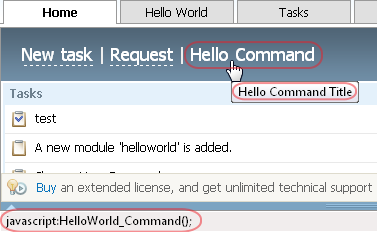
    {L"HELLOWORLD_COMMAND", L"HELLOWORLD_COMMAND_TITLE", L"javascript:HelloWorld_Command();"}
};
- Implementation of the IToolbar::Total method.
//+------------------------------------------------------------------+
//| Total number of commands                                         |
//+------------------------------------------------------------------+
int CHelloWorldToolbar::Total(void)
   {
//---
    return(_countof(m_toolbar));
   }
- Implementation of the IToolbar::Total method.
//+------------------------------------------------------------------+
//| Get info about commands                                          |
//+------------------------------------------------------------------+
TWRESULT CHelloWorldToolbar::InfoGet(int toolbar_num,ToolbarInfo *info)
  {
//--- Checks
   if(toolbar_num<0 || info==NULL) ReturnError(RES_E_INVALID_ARGS);
//---
   if(toolbar_num>=_countof(m_toolbar)) return(RES_E_NOT_FOUND);
//---
       memcpy(info,&m_toolbar[toolbar_num],sizeof(*info));
    //---
       return(RES_S_OK);
      }
- Implementation of the IToolbar::IsAccessible method. For simplicity, we won't implement any permission checking, i.e. Hello World module commands will be available for all TeamWox users.
//+------------------------------------------------------------------+
//| Command accessibility - check permissions                        |
//+------------------------------------------------------------------+
TWRESULT CHelloWorldToolbar::IsAccessible(const Context *context,int toolbar_num)
  {
//--- checks
   if(toolbar_num<0 || context==NULL) ReturnError(RES_E_INVALID_ARGS);
//---
   if(toolbar_num>=_countof(m_toolbar)) return(RES_E_NOT_FOUND);
//---
   return(RES_S_OK);
  }
- Implementation of the IToolbar::ProcessHeader method. Output of additional code is performed just like in IModuleMainframeTopBar::MainframeTopBar.
//+------------------------------------------------------------------+
//| Output additional code                                           |
 //+------------------------------------------------------------------+
 TWRESULT CHelloWorldToolbar::ProcessHeader(const Context *context)
   {
//--- Checks
   if(context==NULL || m_server==NULL) ReturnError(RES_E_INVALID_ARGS);
//---
   context->response->Write(L"<script type='text/javascript' src='");
   m_server->WriteStamp(context, L"/helloworld/res/js/helloworld.js");
   context->response->Write(L"'></script>");
//---
   return(RES_S_OK);
   }
The IServer::WriteStamp method appends postfix (hash of last modification date) to the name of resource file. Thus, if the resource file has not changed, it won't be requested when loading the module, as browser can get it from cache.
If the resource file has changed, it will be explicitly reloaded, as due to changed postfix the resource file will get new name.
4.1.5. So, let's see what we've got. Compile the module, start the server and open TeamWox main page.

4.2. Downloading Module Scripts in Topmost Frame
Sometimes you may need custom commands to be available on any page (for example, tooltip with various information). In such cases it's better to load commands in topmost frame. For this purpose you should use the IModuleMainframeTopBar interface.
The IModuleMainframeTopBar interface provides only one method MainframeTopBar. In implementation of this method you can add your JavaScript code that will be loaded once along with main page code. Then available custom functions can be called from other modules.
As an example to illustrate this concept, we will modify example from the previous topic. Let's put JavaScript function to another file (\modules\helloworld\res\js\helloworld_topbar.js) and change the text of output message.
function HelloWorld_TopCommand()
  {
    alert("Top!!! <lngj:HELLOWORLD_COMMAND />");
  }
4.2.1. In the CHelloWorldModule::GetInterface (const wchar_t *name, void **iface) method list and return the pointer to the IModuleMainframeTopBar interface, that will be implemented in the module.
//---
   if(StringCompareExactly(L"IModuleMainframeTopBar",name))
     {
       *iface = static_cast<IModuleMainframeTopBar*>(this);
       return(RES_S_OK);
     }
4.2.2. In the module class inherit method of the IModuleMainframeTopBar interface.
class CHelloWorldModule : public IModule, public IModuleMainframeTopBar

..........................................

public:
      TWRESULT          MainframeTopBar(const Context *context);
4.2.3. In the IModuleMainframeTopBar::MainframeTopBar method implementation, output the HTML code that loads JavaScript file with custom function.
//+------------------------------------------------------------------+
//| Get module's interfaces                                          |
//+------------------------------------------------------------------+
TWRESULT CHelloWorldModule::MainframeTopBar(const Context *context)
      {
//--- Checks
   if(context==NULL || m_server==NULL) ReturnError(RES_E_INVALID_ARGS);
//---
   context->response->Write(L"<script type='text/javascript' src='");
   m_server->WriteStamp(context, L"/helloworld/res/js/helloworld_topbar.js");
   context->response->Write(L"'></script>");
//---
   return(RES_S_OK);
      }
4.2.4. To call a custom function, you must use the following URL. The top prefix means that the function is available on the page, located on a higher level (according to DOM terminology), i.e. in the topmost frame of the page.
javascript:top.HelloWorld_TopCommand(); 
Conclusion
We have reviewed the basic aspects of setting custom modules environment in TeamWox groupware. In the second part we will talk about adding custom texts in the "Tips" module. You will also learn about widgets on the main page, as well as distributing custom modules in compressed form.
Currently the following articles are available:
- How to Add a Ready-Made Module to TeamWox
- How to Add Page into TeamWox Module
- Building User Interface
- Interaction with DBMS
- Creating Custom Reports
- File Storage - Part 1
- File Storage - Part 2
- Setting Up Custom Modules Environment - Part 1
- Setting Up Custom Modules Environment - Part 2
- Setting the Online Assistant on Your Website
- How to create additional language pack for TeamWox
2011.03.29
