Introduction
The architecture module is undoubtedly one of the advantages of the TeamWox group system. It's very easy to integrate the module into the system. And while in order to write the module one must have a good knowledge of programming languages (particularly C++), the process of integration can be easily mastered by any user. You will see this once you finish reading this article.
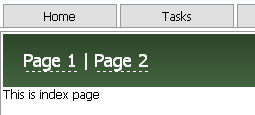
We examine the process of adding a module by looking at a training module Hello World, which is included into the set of development tools of TeamWox SDK. This simple module, with a familiar to all programmers name, is presented in source code with detailed comments. The module contains two simple pages, which in multiple ways display simple text data. In order to compile and add it to TeamWox, we will need 3 components:
TeamWox server. First of all, we need to install a local TeamWox test server. It needs to be a local server, since the process of adding modules involves frequent restarting of the server, which is unacceptable for a TeamWox work server. We won't be focusing on the details of installation, because they are laid out fully in TeamWox Server Installation Guide.
TeamWox SDK. This set of development tools includes a full TeamWox API and two training modules, Hello World and the Board (the Board module is included into TeamWox standard delivery) with complete source codes. Install TeamWox SDK by downloading the distributive. By default TeamWox SDK is installed in the
C:\Program Files\TeamWox SDK\folder, but you can select a different target folder.Visual C++ compiler. To compile the source codes of TeamWox modules, you will need Microsoft Visual C++, with versions no older than 2005, and you can also use the free version of Express Edition!
The Express version of the Microsoft Visual C++ complier can be downloaded from the web site http://www.microsoft.com/express/Downloads. Select the interface language (Russian is amongst the available languages!) and click the "Free Download" link. The installation program will download the necessary files from the Internet. To save up time and downloading traffic, you can refrain from installing the optional components. When installation is complete, restart your computer.
Configuring the Software Environment
Before adding a new module, we will need to properly configure our software environment.
The TeamWox server can operate in two modes - as a Windows service and as a console application. Working as a service - is the regular mode. When developing and debugging modules, it is essential to review the system's working logs. This functionality is only available through the console mode of the server. In addition, when changes are made to the module, you need to restart the TeamWox server, which is difficult to do in the regular mode, because you would need to reload the TeamWox server every time.
Therefore, we set up the server as a console application:
Uninstall the TeamWox server service. To do this, navigate to the TeamWox installation folder in the Windows command line, and run the following command:
<TeamWox installation folder>\teamwox.exe /uninstalYou can then verify that the service 'TeamWox Server' is removed from the list of Windows services.
Run the TeamWox server as a console application. To do this run the following command in the TeamWox installation folder:
<TeamWox installation folder>\teamwox.exe /console
Now in order to run the server you just need to execute the console command (for convenience you can record it into a batch file), and to stop it - you can press Ctrl+C in the console, or just close the console window.
Compiling and Installing the Module
And now we are ready and can begin. Using the training project, with the traditional name of Hello World, as our example, let's examine the process of compiling and adding modules to TeamWox. This project is located in the <TeamWox SDK installation folder>\Modules\HelloWorld\ folder.
1. Let us open the HelloWorld.vcproj project in Microsoft Visual C++ 2008 Express Edition by selecting Open | Project/Solution from the File menu.
2. Compile the project. To do this, select the menu Build | Build Solution or press F7. The project is compiled by default into the folder <TeamWox SDK installation folder>\Modules\HelloWorld\final\

3. If at the current moment TeamWox is running on your computer - terminate it by pressing Ctrl+C in the console.
4. Now navigate to the folder <TeamWox installation folder>\modules\ and create a new folder within it for our module \helloworld. Copy the contents of the \final folder (including the \res and \templates subfolders) into the new folder.
final\ stores the module's resources, such as templates, images, scripts, and other resources that are needed for the display and operation of the module pages.5. Start the TeamWox server by once again running the following command: teamwox.exe /console.
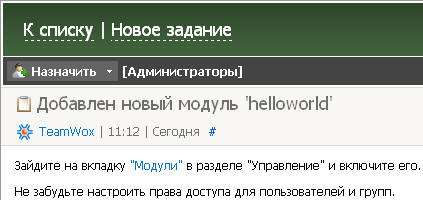
6. Once you connect to the system, you will immediately learn about newly added module - all users of the Administrators group are automatically assigned a corresponding task:

Enabling the Module
Our helloworld module has been added to the system, but it has not yet uploaded. Now we need to provide TeamWox administrators with using rights for the module. For each new module, this procedure is done only once.
1. Go to the Administration section and press the Modules tab.
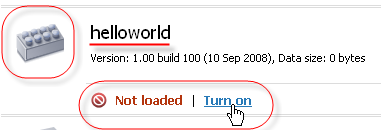
2. Click Turn on, then shut down and restart the server.

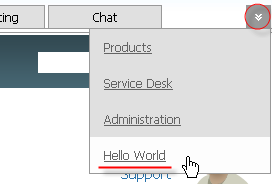
3. Again go to the Administration section to the Modules tab. The Hello World module had now been loaded. The icon and the module's name have now been changed.

Setting access rights
Now we need to assign user access rights to this module, since they are not configured by default, and thus the module is not available to anyone. This procedure is also performed only once.
1. In the Administration sections go to the Groups tab, select the All group, then go to the Permissions tab, and enable a full access to the Hello World module for all users, by checking the appropriate checkboxes.

2. Save your changes by clicking Update and then re-connect to the TeamWox system. Now the Hello World module is available for all users.


Configurations of the Visual C++ project
For the development and testing of modules it would be reasonable to automate some of the instructions stages, described above. In particular, we can configure the project HelloWorld.vcproj in such a way, that the resulting compiled files would immediately transfer into the <TeamWox installation folder>\modules\helloworld\ folder, and so that the module, after compilation, would be launched along with the console TeamWox application.
1. In Visual Studio go to the properties of the HelloWorld.vcproj project, by selecting from the menu Project | Properties or by pressing Alt+F7.
2. In the Configuration Properties group go to the Linker section, then to the General subsection.

3. Change the destination folder in which the resulting HelloWorld.dll file will be stored. To do this, change the line Output File from .\final\$(ProjectName).dll to <TeamWox installation folder>\Modules\helloworld\$(ProjectName).dll.
![]()
4. From the Configuration Properties go to the Debugging section.
5. For the Command parameter enter the path to the <TeamWox installation folder>\teamwox.exe.
6. Since you will launch the TeamWox server as a console application, you must also specify the command line parameter. Therefore, for the Command Arguments parameter, type in: /console.

7. Click OK and save the project.
8. Now, in order to run the compiled Hello World module along with the TeamWox server, just select Start Without Debugging from the Debug menu, or press Ctrl+F5.

Ctrl+C in the console menu, or just close the console window.
Conclusion
And so we have made the first step towards expanding the capabilities of TeamWox. In the future, we plan to release a series of articles, which provide a detailed description of how to add new pages, work with the database, use file storage, and more.
- How to Add a Ready-made Module to TeamWox
- How to Add Page into TeamWox Module
- Building User Interface
- Interaction with DBMS
- Creating Custom Reports
- TeamWox File Storage - Part 1
- TeamWox File Storage - Part 2
- Setting Up Custom Modules Environment - Part 1
- Setting Up Custom Modules Environment - Part 2
- Search and Filtering - Part 1
- Search and Filtering - Part 2
- Setting Up Online Assistant On Your Site
- How To Create Additional Language Package For TeamWox
2010.06.17