- Welcome
- Home
- Tasks
- Documents
- Service Desk
- Chat
- Organizations
- Contacts
- Board
- Team
- Products
- Accounting
- E-Bank
- Search
- Calendar
- Telephony
- Digital Receptionist
- Blacklist
- Callback
- Setup Example
- Inbound Rules
- Show log
- Outbound Rules
- Permissions
- Providers
- Reports
- Settings
- SIP Log
- Extensions
- Administration
- Projects
Setup Example
The TeamWox groupware system allows you to organize your corporate telephony without having to install any additional software or hardware. For these purposes, TeamWox contains the "Telephony" module, as well as special corporate messenger TeamWox Communicator that is tightly integrated with the system.
Intracorporate communication is available to your staff members immediately after you enable the module. It does not require a contract with any provider of telephony.
Another advantage of TeamWox telephony is the possibility to organize external telephony on the basis of any (or several) VoIP providers. And it does not matter whether the provider is located in your country or abroad.
Setting Up Internal Corporate Communications (Enabling Module)
The first step to organizing your own corporate communications is to enable the Telephony module. You do not need to download the module, your system already contains it, or it will appear during update. Go to the "Modules" tab in the Administration section.

If the module is not enabled, turn it on. After that, restart TeamWox by clicking on appropriate button at the top of the tab. After restart, you will see that the module is successfully enabled:

Immediately after the module is enabled, without any additional settings, all employees are able to make calls within the company using the TeamWox Communicator. |
Setting Up External Communications
Setting up external calls is easy. The process consists of the following major steps:
- Setting Up the Provider
- Setting Up Outbound Rules
- Setting Up the Digital Receptionist
- Setting Up Inbound Rules
- Setting Up Extensions
Setting Up the Provider
The first step is to choose the provider of IP telephony for organizing external calls. In this example, we'll use one of the most popular providers — VOIPcomplete.
You must first sign a contract with the provider. The contact details can be found in "Contact Us" on the official website of the provider. After signing the contract you will be given a telephone number, as well as login and password, which should be used when configuring telephony in TeamWox.
Go to the "Providers" section and create a new configuration by clicking "New provider".

After you enter the name of the provider, TeamWox will automatically select its settings — server address and port for connection.
In addition to VOIPcomplete, the "Telephony" module provides automatic configurations of more than 30 providers. Click |
Next, turn on all the options: "Enable", "Incoming" and "Outgoing". This will allow the use of this configuration, as well as incoming and outgoing external calls.
Contact your provider to find out the number of lines that can be simultaneously used for incoming and outgoing calls. Then specify this value in the "Number of lines" field. This parameter is used in rules of routing of outgoing calls. If all lines of the provider are busy, the outbound rule that routs calls through it, will be skipped. Thus, if your company uses another provider, the call will go through it. If this field is empty, the number of lines will be ignored when checking rules. And if all lines are busy, the caller cannot make a call.
The final step is to specify the login and password obtained after concluding the contract with VOIPcomplete.
Parameters "Outbound Caller ID" and "Registration IP" do not require configuration and therefore are dimmed. |
After saving the settings, you can move on to the next step.
Setting Up Outbound Rules
Setting up outbound rules is required for calls to external numbers. Go to the "Outbound Rules" tab.

Each rule is described quite simply:
- the rule with the specified name
- applies to calls of the specified users
- to the numbers of the specified length
- that start with the specified digits/characters
- these digits/characters should be replaced by the specified ones
- the call should be routed to the specified provider.
For example, the following rules are configured in the above figure:
- The International rule applies to the user John Smith and the group Technical Support when calling to numbers over 11 characters long starting with the sign "+". The "+" sign should not be replaced (replace by the same character), call should be routed to the provider VOIPcomplete.
- The Local rule applies to the user John Smith and the group of Technical Support for calls to numbers 7 characters long. Prefix "+7843" should be added to the dialed number and the call should be routed to VOIPcomplete.
- The Default VOIPcomplete rule is a default rule created automatically when you added a provider configuration. It routs all outbound external calls through the provider VOIPcomplete. This rule cannot be removed. This is done to ensure that all calls are processed by the system.
- The Default - Skype for SIP rule is a default rule created automatically when you added one more provider configuration Skype for SIP. If the call does not match any of the routing rules through the VOIPcomplete provider and all the provider's lines are busy (specified in the parameter "Number of lines"), then the call will be routed through Skype for SIP.
Rules are checked from top downwards. If a dialed number corresponds to the conditions of the top rule, it is handled under this rule, otherwise conditions of the second rule are checked, and so on. To move a rule left click in a cell with the number of the rule and, holding the mouse button, drag it to the desired position. |
Digital Receptionist
The digital receptionist allows you to organize any voice menu for incoming calls. For example, it may be an automatic information desk, a usual greeting and routing to a common telephone or the reception, etc.
Go to the "Digital Receptionist" tab. To add a new digital receptionist configuration, click "Add digital receptionist" at the top of the tab.

The key points in the digital receptionist configuration are the following:
- Record a voice message. To add a recorded voice message, press "Select a sound file" to the right of the name. Sound files of *.mp3 and *.wav format can be used for the digital receptionist.
- Assign actions to telephone keys. During the voice message, the caller can perform actions by pressing telephone keys. Description of the keys should be included in the voice message of the digital receptionist.
An important feature is the ability to transfer from one digital receptionist to another. With this feature you can set up multi-level voice menus. |
Let's consider in details the sample digital receptionist configuration:

autoattendant.mp3 audio file has been selected for Auto Attendant. During the message play back, the caller can perform the following actions:
- After pressing 1 the caller is connected with Accounting department. The call will be routed simultaneously to all employees within the group. The connection will be established with the first user who responds to the call.
- After pressing 2 the caller is connected with Directors department. The call will be routed simultaneously to all employees within the group. The connection will be established with the first user who responds to the call.
- After pressing 3, the caller listens to the digital receptionist's voice message once again.
- If a client has not dialed an employee's internal number or a voice menu command, the voice message (autoattendant.mp3) is played back again.
- If none of the employees answers the call, the voicemail handler's message is played back and recording starts.
At any time of digital receptionist operation, an extension number can be dialed. After that the call will be transferred automatically. In connection with this feature, the first digits of extension numbers may not coincide with digital commands that are configured for the digital receptionist. For example, the extension numbers may begin with 1 (100, 1017, etc.), and for the digital receptionist control you can assign all the remaining numbers and symbols except 1. |
Inbound Rules
Inbound rules are used for routing incoming calls from external numbers. Go to the "Inbound Rules" tab.

Each rule is described as follows:
- a call received from the specified provider,
- from the number that starts with the specified characters/digits,
- at a specified time
- is completed or routed
- to the specified digital receptionist or user (group of users)
The following inbound rules are configured in the above figure:
- Calls via the provider VOIPcomplete that start with any digits/characters, at work time indicated in the "Default" setting are routed to the digital receptionist Auto Attendant.
- A default rule is created automatically when you added a provider. It always directs all incoming calls received through the provider VOIPcomplete, the default digital receptionist Default. This rule cannot be removed. This is done to ensure that all calls are processed by the system.
Rules are checked from top downwards. If a dialed number/call time corresponds to the conditions of the top rule, it is handled under this rule, otherwise conditions of the second rule are checked, and so on. To move a rule left click in a cell with the number of the rule and, holding the mouse button, drag it to the desired position. |
Setting Up Extensions
Extensions enable direct calls to the staff from outside. Knowing the extension of an employee, the caller may skip the voice message. It can be dialed at any time, immediately after this the call will be transferred to the appropriate staff member.
If an employee does not need to take external calls, you can skip this step. |
To configure the extension, go to "Extensions" and select the desired user.

Enter the extension number in the appropriate field and click "Save". Repeat this procedure for each user who needs to take external calls.
The extension number can be dialed at any time of the call, including during the voice message of the digital receptionist. In connection with this feature, the first digits of extension numbers may not coincide with digital commands that are configured for the digital receptionist. For example, the extension numbers may begin with 1 (100, 1017, etc.), and for the digital receptionist control you can assign all the remaining numbers and symbols except 1. |
After this step, setting up corporate telephony is completed. Now all employees can make calls through the TeamWox Communicator.
Checking the Operation in Journal
All calls are displayed in the Telephony Journal. Use the journal to verify the correctness of call processing.
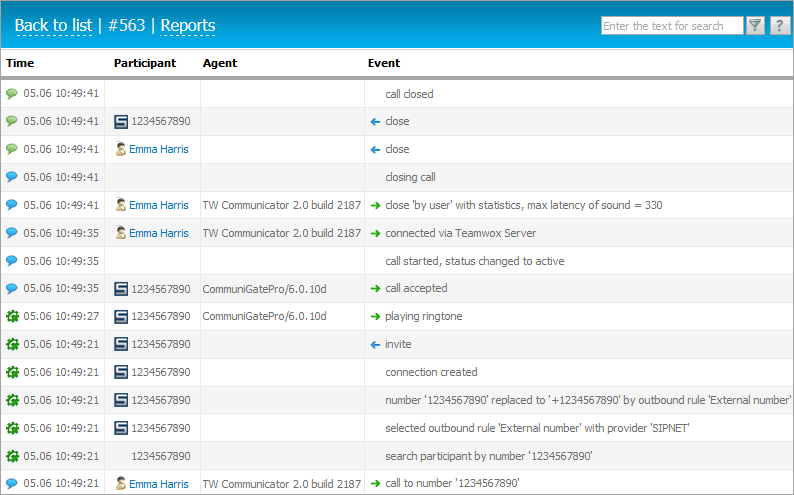
Consider the following example. The above figure shows details of the call with the ID "#563". It shows each stage of the call:
- The first entry says that Emma Harris has dialed number 1234567890 via TeamWox Communicator.
- The second entry indicates that number 1234567890 is searched for on the TeamWox server.
- The third and the fourth entries show that rule "External number" has been applied for the call, and therefore the call has been converted to +1234567890 and forwarded via the SIPNET provider.
- The next steps describe the following:
- Connection has been established.
- The server has sent subscriber 1234567890 an invitation to participate in the call.
- The server has received information that the participant is available (a ringtone played at the subscriber's side indicates that he or she is available).
- The call has been accepted.
- The call has started, status changed to "active".
- Connection established via the TeamWox Server.
- The following five entries demonstrate the process of call end:
- Emma Harris has initiated call end with the maximum sound delay during the conversation 330 ms.
- Call is being closed.
- Emma Harris has closed the call.
- Subscriber 1234567890 has closed the call.
- Call closed.