- Welcome
- Home
- Tasks
- Documents
- Add Document
- Attachments
- Create Document
- Create Folder
- Delete/Restore
- Edit Folder/Document
- Filters
- Information
- List of Documents
- Permissions
- Reports
- Setting Up WebDAV
- Documents widget
- Service Desk
- Chat
- Organizations
- Contacts
- Board
- Team
- Products
- Accounting
- E-Bank
- Search
- Calendar
- Telephony
- Administration
- Projects
Create Folder
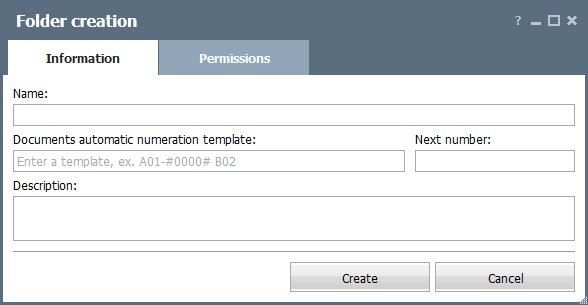
In order to create a folder, you should press the "Create folder" button. The window of creating a folder appears, as soon as you press it. This window contains three tabs:
Information
Main parameters of a folder are set up at this tab.

The following field are present here:
- Name — name of a folder.
- Documents auto-numeration template — in this field you can specify a special macro for automatic assigning of numbers to documents that are added or created in this folder. The number is specified in the following format: Any text #00...00# Any text. Between the "#" symbols using zeros you should specify the number of digits in the number (00 - two-digit numbers, 000 - three-digit numbers, etc.), to the left and to the right of it you can specify any text. For example, if you use the "2010-#000#" macro, then the 2010-001, 2010-002, etc. numbers will be consequently assigned to documents.
- Next number — in this field you can set an initial number for the varying part of automatically generated numbers. For example, if you use the "2010-#000#" macro as the template and you specify 15 in this field, then the numbers starting from 2010-015 will be consequently assigned to documents.
- Description — a comment to a folder that will be displayed as a pop up help if you put the mouse cursor over its name.
|
Permissions
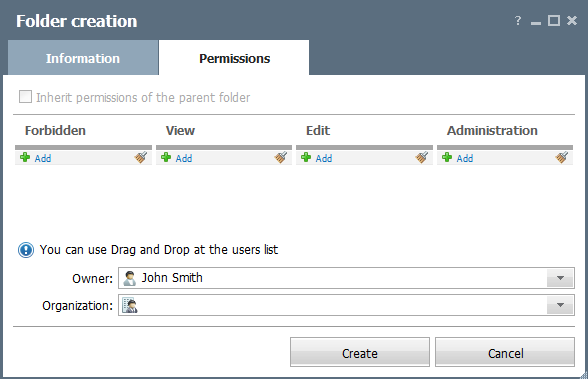
On this tab, you can assign various access rights to the folder.

- The access right can be granted or taken away with the help of the
 Add and
  buttons. The window of assigning users/groups described in the "Interface description -> List of Assigned" section appears, if you press the "Add" button. To delete all the assigned users/groups from the list, you should press the
  button. If you need to remove only one user/group from the list of assigned ones, you should press
  , located to the right of each assigned user/group.
 - The access rights are divided into categories: "Forbidden" - the list of users/groups that are not able even to view the folder, "View" - the list of users/groups that can view the folder, "Edit" - the list of users/groups that can work in this folder (add, edit and delete files), "Administration" - the list of users/groups that can perform any actions with the folder (including changing properties and removing the folder).
- The owner of the document is specified in the "Owner" field. The user whose login is used to enter TeamWox during the current session is automatically placed in this field. If necessary, you can change this by pressing the "Change" button located at the end of the "Owner" field. The window of assigning user similar to the described above appears. The only difference is the possibility of assigning only one user (not a group). This fact determines the absence of the "Select all" button.
- The "Organization" field is intended for binding the folder to one of organizations added to the corresponding module. Folder that is bound to the organization is displayed at the special tab when viewing the organization.
|
Once having all the information entered and all permissions assigned you should press the "Create" button to add the folder to the list. If you press the "Cancel" button, you will be returned to the previously visited window and the folder will not be saved.