- Welcome
- Home
- Tasks
- Documents
- Service Desk
- Chat
- Organizations
- Reports
- Add/Edit
- Autobinding
- Delete/Restore
- Export of Organizations
- Filters
- Import of Organizations
- List
- Module Settings
- Permissions
- Settings
- View
- Organizations Widget
- Contacts
- Board
- Team
- Products
- Accounting
- E-Bank
- Search
- Calendar
- Telephony
- Administration
- Projects
Viewing Organization
To view organization details, left-click on its name or logo in the list of organizations. By default, the tab visited previously will be opened for viewing.

Navigation buttons are available on all organization viewing tabs:
- To list — go back to the list of all organizations.
- Prev — view the previous organization. The Previous button is not available when you are viewing the first organization in the list.
- Next — view the next organization. The Next button is not available when you are viewing the last organization in the list.
In addition to the navigation buttons, all tabs provide the organization Search bar and Help button  .
.
Overview
The "Overview" tab provides a summary of the organization which can be divided into several parts.
Information about the organization
General information about an organization is shown below the top panel: company name, type, status, rating, SLA, contact person, e-mail, website, phone number, ID, manager and creation date. General information is displayed identically on all tabs except for the "Accounting" section.
The page header always contains the name of a viewed organization, no matter how large the list of comments or the task text is. To quickly move to the top of the page just click on the title. |
Every organization has an automatically generated unique number (CID). It looks like #1234. This is a permanent link to the organization. It can be copied via the context menu, and then pasted into your messages.
To edit company information click ![]() .
.
Using the  button, you can prepare the information about organization for printing. Once you press it, the information will be opened in the preview mode. Further you can print it using the standard function of browser.
General information is followed by "Contact", "Accounting data" and "Custom fields".
To upload an image (e.g. company logo), click  . You can upload an image from a file or take a photo with a webcam.
To facilitate the transfer of data between different modules, you can copy them to clipboard. To copy the general information click ![]() next to the organization creation date. To copy information from separate blocks click similar buttons located next to the block names.
next to the organization creation date. To copy information from separate blocks click similar buttons located next to the block names.
Organization Contacts
A table with a list of contacts appears below the common details. The data in the table are adjustable. To do this, click  . Tick required columns in the appeared list and click .
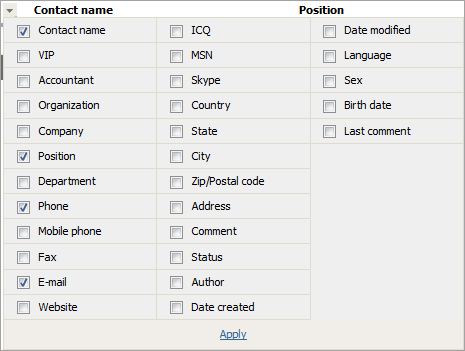
A quick search bar is available at the top of the table. Using this bar you can quickly find a contact by its data.
List of Recent Changes
"Recent Changes" are shown below the list of contacts. This section contains the latest comments posted by employees, as well as system entries created automatically when organization details are modified.
To add a new comment in the organization history click ![]() . This button is located next to the title.
. This button is located next to the title.
Click to open the History tab.
In addition to the company name, the page header always contains available action buttons: |
Edit
This tab is intended for editing the information about an organization. However, the user must have sufficient access rights to do it. The access rights can be granted by the administrator of your TeamWox system. This tab contains the same fields as described in the Adding and Editing an Organization section. If you want, you can edit any field. To save the changes, you should press the "Update" button. To cancel the editing of information, you should press "Cancel". You will be passed to the previously visited tab as soon as you press "Cancel".
History
This tab displays a history of working with the organization that is composed of comments posted by employees, as well as system entries created automatically when organization details are modified. Also here you can add a comment by clicking  in the right part of the tab above the list and below it. When you click on this button, the Message Editor opens. As soon as you have entered a comment text, click "Add". If you want to cancel adding a comment, click "Cancel".

To the right of the comment date sign# is shown. This is a permanent link to the comment. You can copy this link via the context menu, and then paste into your messages.
To copy a comment to clipboard click ![]() . If you want to translate a comment into other languages , click
. If you want to translate a comment into other languages , click ![]() .
.
The corresponding entries are automatically added to the history, if an organization is added ("New organization added") or if any information field of the organization is modified ("The following fields were changed: Rating, Status..."). |
If a history message contains attached files, you can copy them to the "Documents" module by pressing the  button that appears to the right of the attached file name when you put the mouse cursor over it. This function is available if you have access to the "Documents" module.
Messages to the history of the organization can be added from the "Home" page, from the tooltips with brief information on organization links, and from the organization overview page. In order to add messages this way you should press the "Note" button. The following window will appear as soon as you do it:

In the upper field choose an organization using the  button. The list containing all available organizations will appear as soon as you press it; instructions on how to use it are given in the corresponding section. In the message editor below you should enter the text to be added to history. In order to save the message you should press the "Add" button or the "Ctrl+Enter" key combination.
The manager and the assigned users receive notifications about new comments (not automatic) in the history of the organization. |
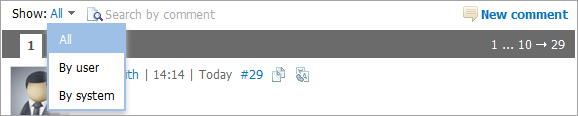
For quick search in comments, you can sort out the comments by their type (All, Users, System) and use a quick search bar.
In addition to the organization's name, the header of the page always displays the following:
|
Documents
This tab contains the list of documents and folders that were bound to the organization while adding or editing them.

Here you can also quickly add a document to the selected organization. To do it you should press the "Add document" button located at the top part of the tab.
All the incoming and outgoing mails specially or automatically assigned to an organization are displayed here:

This tab displays only the messages that came to the mailboxes, to which the user has access. Mails that came to the other mailboxes and were assigned to the user are not displayed here. |
Contacts
The specific contact persons of the organization are shown on this tab. To add a new contact person, you should press the "New contact" button located in the upper part of the tab. You will be passed to the window of adding a new contact of the "Contacts" module as soon as you press it:

This window contains the columns chosen in the "Contacts" module while viewing the contact list. Therefore, the changes made while viewing the contact list in the "Contacts" module will automatically affect this window, too.
Use the Search bar above the table to fined the desired contact.
Accounting
This tab is only visible to users that have access to the "Accounting" module. The information about financial operations related to the chosen organization is displayed here. The description of this tab is given at the "Integration with Organizations Module" section of the help to the "Accounting" module.
Chat
If there are dialogs assigned to this organization in the "Chat" module, they should be listed on this tab:

The window of viewing the dialog opens if you press on the name of the dialog.
Service Desk
This tab displays a list of requests bound to the selected organization.
The "Contacts", "E-Mail", "Documents", "Chat", "Accounting" and "Service Desk" tabs are visible only if you have the sufficient access rights to open the corresponding modules. |
Calls
This section displays information about incoming and outgoing calls associated with the organization or its contacts.
Call details appear on the list if the phone number to which (or from which) call was made is specified in the "Contacts details" of the organization or a related Contact.
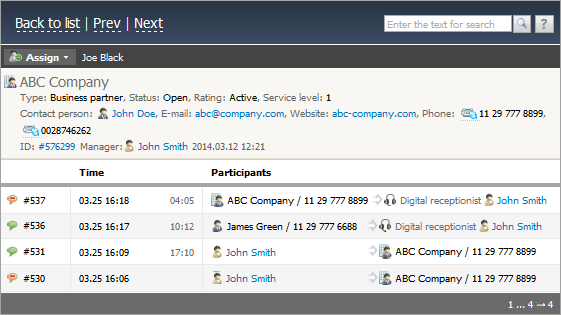
The table displays the following information:
- Call status.
- A unique ID of the call in the system (indicated after the "#" character).
- The time of the call.
- Call duration.
- Call participants and the phone number of the organization (contact).
← Delete/Restore
List →
|