Public Component
A part of the "Chat" module is the public component that allows to integrate this module into any website. Once the public component is installed, visitor of the website will be able to communicate with the TeamWox users through the chat. All chats are stored within the system. Dialogs that are bound to clients are conveniently displayed on a separate tab when viewing them in the "Organization" module.
The TeamWox groupware is protected from spam attacks through the public component of the "Chat" module. After receiving a large number of requests from one IP address, a ban is set for 2 minutes to several hours, depending on the frequency of such requests.
To initialize the public component, you should place the "support.html" file containing the following code at your website:
<!DOCTYPE html PUBLIC "-//W3C//DTD XHTML 1.0 Transitional//EN" "http://www.w3.org/TR/xhtml1/DTD/xhtml1-transitional.dtd"> |
In the same category, you should place the 'chat' folder, which contains all the files required for chat operation. Download files for JavaScript chat version.
|
You can also set up different parameters of the chat window inside the "window.Chat.init()" function.
- client details: name, email, phone, company, account
- digital_signature
- group
- topic
- cache
- language
- filter
- group_id
- topic (for autologin)
- config
- autologin
In the subsections of this chapter, you can find detailed examples of implementation of the public component of the "Chat" module in PHP and .NET. |
Common Settings
Client Details
To obtain the information about clients the following parameters are implemented:
- name=[CLIENT NAME]
- email=[CLIENT EMAIL]
- phone=[CLIENT PHONE]
- company=[CLIENT COMPANY]
- account=[CLIENT ACCOUNT]
This group of parameters mentioned above allows to specify predefined values of fields for clients. Names, mail addresses, phone numbers and company names can be automatically filled in from the details of users registered at your website. At that these fields will be uneditable by clients.
The automatic binding of dialogs to organizations by e-mail address functions in the TeamWox system. |
digital_signature=[MD5 of concatenation of the displayed fields and keyword]
To make possible the filling in of user details (name, phone, company name, etc.) from the information kept at your website, you should add the digital signature parameter (digital_signature) to the "support.html" file. In the value of the "digital_signature" parameter you should specify the MD5 hash from the concatenation of the used field values (name, company, phone, etc.) and keyword. That keyword will also be specified in the settings of the "Chat" module. In future the checking of digital signature will be performed by the TeamWox system and, in case of success, the fields will be automatically filled out and locked for editing by users.
Currently this technology is under development. In order to enable the filling in of information it is enough to assign any value to the "digital_signature" parameter. |
group=[CHAT GROUP]
This parameter is intended for selecting a service group, that will be used as a default one in the login window. If the name of the service group consists of two words, then instead of the space between words you must specify "%20", for example: "technical%20support".
topic=[FULL OR PARTIAL NAME OF TOPIC]
Predefined topics for discussion can be created in each group. This parameter is intended for selecting a topic to be used as a default one in the logon window. As the value of this field you can specify only a part of a topic name. The system will automatically search the specified word or phrase among the created topics and select a suitable one.
cache=[PERMISSION TO CACHE DATA]
On default, information specified by users when trying to log in to the "Chat" is cached. In order to disable the caching, you should specify this parameter with the "false" value.
language=[LANGUAGE]
The default language is the one chosen in the system. To compulsory change the language you should specify one of the following values for this parameter:
- ru — for Russian language;
- en — for English language;
- cn — for Chinese language;
- tr — for Turkish language;
- ar — for Arabic language;
- es — for Spanish language.
- it — for Italian language;
- fr — for French language;
- de — for German language;
- tat — for Tatar language;
- az — for Azerbaijani language.
Only two languages are available in the JavaScript version: ru and en. |
filter=[KEYWORD]
This parameter allows to filtrate only necessary service groups by the keywords specified in them. In such a manner you can make available only specific groups when calling the chat from a website. We can consider as an example the English page of a website where there is no need in the Russian speaking group. If you specify "english" in this parameter and in the settings of the service group, clients will be able to see only that group. You can specify only one value in the "filter" parameter of the HTML file used on the website. However, you can specify several values in the settings of a service group. Thus, you will be able to receive messages from different websites through one group.
Let us consider an example when we have two websites dedicated to different products and one group that provides their support.
In this case, in the HTML file for the first website we specify the "product1" keyword:
window.Chat.init(document.getElementById('chat'), |
In the HTML file for the second website we specify the "product2" keyword:
window.Chat.init(document.getElementById('chat'), |
Then we specify both of these parameters separated by comma in the settings of the service group in the "Keywords" field: product1, product2:
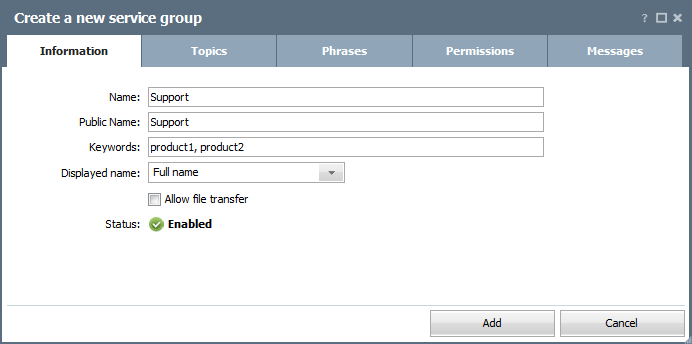
Now requests from both websites will be addressed to one service group.
Now let us consider another example when we need to delimit the availability of different service groups for different websites. We have three versions of the website: in the English, Russian and Chinese languages. There is the "Support (en/ru)" group for the English and Russian versions and "Support (cn)" group for the Chinese version.
We should specify the "en" keyword in the HTML file for the English website:
window.Chat.init(document.getElementById('chat'), |
For the Russian version set "ru":
window.Chat.init(document.getElementById('chat'), |
For Chinese set "cn":
window.Chat.init(document.getElementById('chat'), |
Then in the settings of the "Support (en/ru)" group we should specify the "en" and "ru" keywords separated by comma, and in the settings of "Support (cn)" - only "cn".
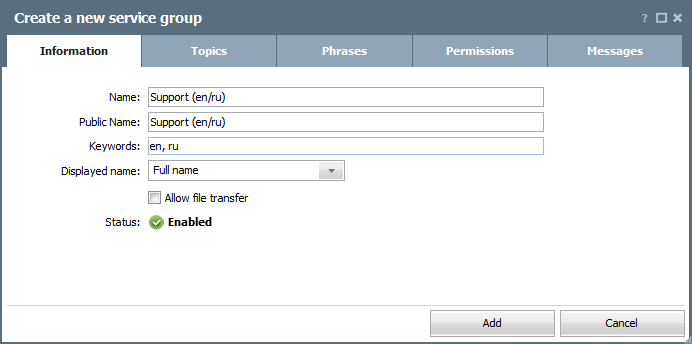
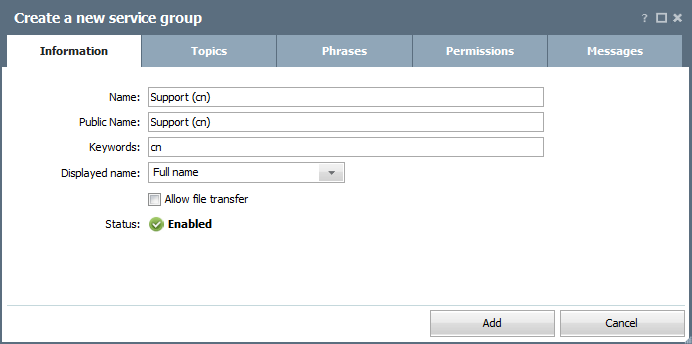
In this case only the corresponding service groups will be available for the clients on the websites.
You should specify the values that are picked up at your website (the information specified by the clients when they register at your website). |
Automatic Login to the Chat
There can be a situation, when a user should be authorized in the chat (enter the chat) without showing the logon window for specifying personal details. For example, if the user opens the chat from a website profile (being an authorized user), and all the required information about the user is already known (name, email, phone number, etc.).
The main technical difference of such entering the chat is the absence of the request for settings to the TeamWox server: service groups, topic in them as well as the module settings (fields displayed in the logon window) are not requested.
To login automatically, all the information about the users must be specified (name, phone, email, etc.). Another obligatory condition is the presence of the group_id parameter described below. |
The following parameters are implemented for the automatic entering the chat:
group_id=[SERVICE GROUP IDENTIFIER]
In the value of this field you should specify the identifier of a service group. It is displayed in the title of the window of editing settings of the service group (specified in brackets after the # symbol). Only one identifier can be specified.
topic=[FULL NAME OF TOPIC]
The automatic login changes the behavior of this parameter as opposed to authorization through the logon window. In this case the whole value of this field will be used as the topic of the dialog. For example, in case the chat is meant to be opened from the user profile, you can specify topic=Question%20from%20user%20profile.
config=[BIT MASK IN FORM OF INTEGER]
This parameter is intended for enabling/disabling the additional fields of the login window:
- E-mail — 8
- Account — 4
- Company — 2
- Phone — 1
On default, those fields are disabled; and the fact if they're filled or not won't be checked when entering the chat. In order to add these fields, you should specify the sum of their values mentioned above as the value of the "config" parameters. For example, to display the "Company" and "Account" fields, you should specify 6 (4 + 2) as the value of the parameter.
autologin=[PERMISSION FOR AUTOMATIC AUTHORIZATION]
To make the automatic authorization possible, you should specify the "autologin" parameter with the value "true".
autologin: true, |
If this parameter is not specified or its value is "false", the automatic authorization will be impossible.
Chat Window Calling
To start working you should call this HTML page in a separate window using the following scheme:
<a href="javascript:void(0)" onclick="window.open('support.html','support','toolbar=no,resizable=yes, |
Logon Window
Prior to starting a dialog, the client must fill out the following form:
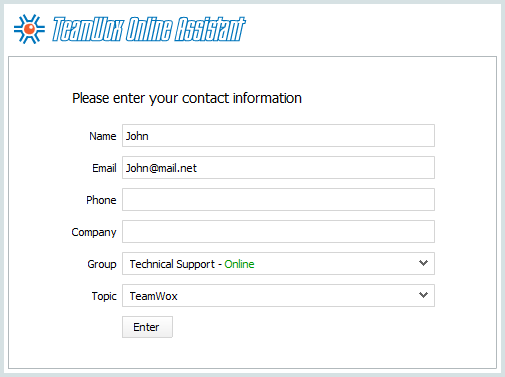
- Name — the client's name.
- Email — the address of the client's e-mail.
- Phone — the client's phone number.
- Company — the client's company name.
- Account — the number of the client's account.
- Group — the choice of the service group preliminarily created in the "Chat" module. To choose a group, you should click with the left button of your mouse on this field and specify the necessary one in the list.
- Topic — the choice of the dialog topic from the list that can be opened by pressing with the left button of your mouse on this field. The topics should also be preliminarily created in the chosen group.
To start a dialog, it is necessary to press the "Enter" button located below the form.
Dialog Window
Here is the example of client's dialog window:
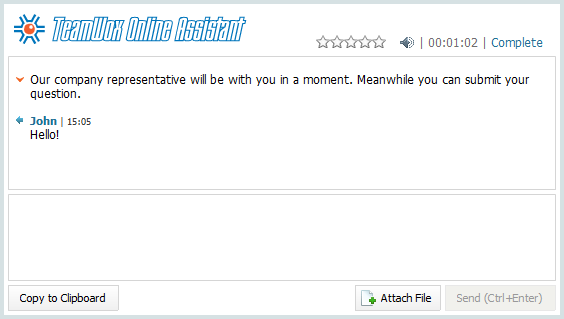
The upper part of the window contains the dialog itself, the lower part is intended for writing messages. To send a message, one should press the "Send" button or the "Ctrl+Enter" key combination.
This window also contains the following controls:
- A client can finish the dialog using the "Close" button, the dialog box being closed. The corresponding entry about that the client has closed the chat appears in the employee's dialog window.
- It is possible to use the
 button to enable/disable the sound informing about new incoming messages.
 - The "Copy to clipboard" button is used for copying the dialog text to clipboard for further use.
- To send a file via chat press "Send a file".
Dialog Rating
In the upper part of the dialog a client can rate the help provided through the chat by the company employees. The following window is opened if you press on the stars:
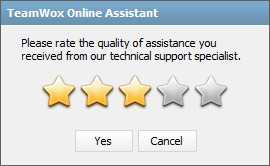
To rate the dialog, click with the left mouse button at the first star and move the cursor to one of the next ones while holding the button. A dialog can be rated by the scale from 1 to 5, the more start are selected the higher the dialog rate is. The rates are displayed in a separate column in the list of dialogs. Reports on the rates are also available in the module.
← Personal
PHP Example →
|