- Welcome
- Home
- Tasks
- Documents
- Service Desk
- Chat
- Organizations
- Contacts
- Board
- Team
- Products
- Accounting
- E-Bank
- Search
- Calendar
- Telephony
- Administration
- Groups
- Users
- Activation
- Articles
- Backup
- Connection
- Console Commands
- Export
- Firewall
- Overview
- Import
- Import from AD
- Journal
- Service Operations
- Modules
- News
- Permissions
- Requests
- Security
- Settings
- Sounds
- Statistics
- Updating
- Projects
Security
This tab contains various security settings of TeamWox. They are divided into several boxes: Certificates, Security for passwords and working sessions, Authentication, Proxy server and Processing of public requests.

Certificates
TeamWox works using the HTTPS protocol through port 443. All the transmitted information is encrypted using the installed SSL certificate. By default a certificate issued by MetaQuotes Software CA is installed in the system. This certificate is untrusted what causes the displaying of the corresponding warning in the browsers of users. To avoid it, one should add the MetaQuotes Software CA to the list of trusted one according to the instructions given in the "Certificate Installation" section.
The upper part of the certificates block contains the information about the certificate already installed: Issuer, Subject, Expires. Various commands of managing the certificates are located below:
Requesting and Installing Certificate
You can generate a request for a certificate to be sent to the certification center by pressing the "Request new certificate" button located in the upper block. Once you have pressed this button, the following window will appear:

The following parameters are specified here:
- Common name — the common name of the certificate.
- Locality — the town your company is located in.
- Organization — your company's name.
- Organization Unit — your company's department responsible for certification matters.
- E-Mail — the e-mail address to contact your company.
- Country — the country your company is located in.
- State/Province — the state/province your company is located in.
- Street — the street your company is located in.
- Domain — the domain your TeamWox system is located at.
- Key length — key length alternatives: 1024 or 2048 bits.
Once all the necessary information has been entered, press the "Continue" button. If you press the "Cancel" button, this window will be closed and the request won't be sent. If you press the "Continue" button, a request to be sent to one of the trusted certificate centers will be generated:

This request should be copied and sent to the chosen certificate center according to its instructions.
A detailed example of obtaining a certificate is described in the "How to Get a Legal SSL Certificate for TeamWox" article at www.teamwox.com. |
Answer received from the certification center should be copied back to TeamWox. To do it, one should press the "Use certificate authority response" button.

In the appeared window it is necessary to insert the answer received from the certification authority. Once you press the "Apply" button, the certificate will be installed in the TeamWox system.
A certification authority can provide the answer of two types — in the X509 or PKCS format. The difference is the latter type includes intermediate certificates in addition to the main one. Thus, when installing the certificate in TeamWox all the intermediate certificates are additionally installed on the server. It guarantees that all browsers will consider the certificate installed for TeamWox as a trusted one.
Depending on the type, the answers of security centers may look as following:
X509 |
PKCS |
|---|---|
-----BEGIN CERTIFICATE----- ... -----END CERTIFICATE----- |
-----BEGIN PKCS #7 SIGNED DATA----- ... -----END PKCS #7 SIGNED DATA----- |
It is recommended to use PKCS format of answers of certification authorities.
If several certificate requests were previously generated then the TeamWox system chooses the right one by itself and applies to it the inserted answer of a certificate authority. |
Reissuing Certificate
Many companies give an opportunity of unlimited reissuing of certificate during the whole period of its validity. The reissuing of certificate may be necessary in the following cases:
- The private key is lost or it became known to a third party;
- Incorrect information was specified in the certificate;
- Certificate doesn't work properly.
In this case in is necessary to re-generate the certificate request. Then it is necessary to go to the website of the certificate issuer and pass the special reissuing procedure. Here are the links to the most popular certificate authorities:
- Thawte — https://www.thawte.com/reissue
- GeoTrust — http://www.geotrust.com/support/ssl-certificate-reissuance/index.html
- Verisign — http://www.verisign.com/ssl/current-ssl-customers/revoke-replace-ssl/index.html
After passing the reissuing procedure, one should insert the answer received from the certificate authority to the corresponding window again. The certificate will be reinstalled as soon as it is done.
Replacing Current Certificate with Another Ready Certificate (*.pfx)
In order to modify the current certificate, you should press the "Change certificate" button. The following window will appear as soon as you do it:

In order to specify a new certificate, press the "Browse" button and choose it in the standard window of file choosing. If your certificate has a password, then you should specify it in the corresponding field. To upload the new certificate, press the "Upload" button. To cancel the operation, you should press the "Cancel" button.
Exporting Certificate
You can download the PFX file of the certificate installed in the system to your PC by pressing the "Export the certificate" button. The window that requests the certificate password appears as soon as you do it. If the certificate does not have one, you should leave the password field empty and press the "OK" button. Once you have done that, a standard browser window should open where you can specify whether to open or to save the file.
Security for passwords and working sessions
To provide the system security, a fixed password complexity control is implemented. Any password must contain as many as 6 characters including lower-case, upper-case and numeric characters. |
Set controlling working sessions by IP addresses
This option allows increasing the security of the system. If it is enabled, the connection session of a user binds to their IP address. Thus, if the next connection is performed from another address then to enter the system the user will have to specify their login and password once again, regardless of the "Remember me" option in the authorization window.
Request to change user password after N days
This option is also aimed at increasing the security of working in the system. If the security policy of of a company requires changing of user passwords after a specific period of time, enable this option and set the number of days. Once the specified time period has passed, a user is asked to change the password right in the TeamWox interface using the following window:

The window contains the following fields:
- Login — in this field, a user login is specified.
- New password — a new password must be specified here. The new password must differ from the previous one. It must be complex enough (be at least 6 characters long and contain upper and lower case letters and digits).
- Confirm — in this field, the new password must be entered again.
- Current Password — to prevent unauthorized changing of password, the current user password must be specified in this field.
This option works only with authentication using login and password. In case a user authorizes in the system through Active Directory or using acertificate, the window of password changing does not appear. |
Authentication
TeamWox provides the possibility to authorize users with their logins and passwords they have in the Active Directory domain or via security certificates.
Authentication in Active Directory
If you enable this option then the users will be able to enter the system using their Active Directory logins and passwords. Also you should specify the domain name in the "Domain" field, for example: "ad.company.com".
Besides enabling the above mentioned option, the special permission should be assigned to the users: "Authenticate by login in domain", it can be found in the "Users -> Permissions" tab in the "Server" block. Also the logins of users in the "TeamWox" system must be similar to the ones in Active Directory. |
ActiveDirectory users may also use their current login and password to authorize in WebDAV for accessing "Documents" and in CalDAV for accessing "Calendar". To activate this feature, enable options "Use for WebDAV authentication in Documents module" and "Use for CalDAV authentication in Calendar module".
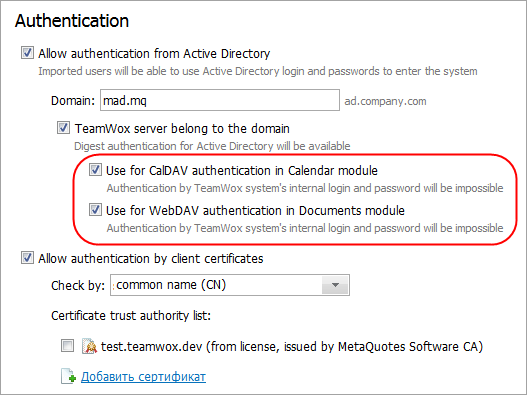
It should be noted that these settings imply some technical restrictions, due to which users created in TeamWox manually cannot use WebDAV and CalDAV. |
To quickly start working in the system one can import users from the Active Directory.
Use client certificates
You can allow the authentication of users via certificates emitted by a trusted certification center. To do it, tick the "Use client certificates via trusted certification centers" field.
- In the "Check by" field, you should select the field of the certificate to check by. Three variants are available: by common name, by E-Mail or by personal certificate. In the first case, the common name of the certificate and the login of the user in TeamWox will be matched. In the second case, the e-mail specified in the certificate and the one specified in the user's contact details will be matched. If you choose the variant of authentication by the personal certificate, then certificates generated for users directly in the TeamWox system will be used.
- In the "Certificate authority list" field you should specify public certificates obtained from certification authorities, by which users will be able to log in to the system. To do it you should press the "Browse" button and specify corresponding *.cr or *.crt file. In order to make the specified certification center take effect, you should put a tick against it.
|
Proxy Server

If the connection of TeamWox server to the internet is performed through a proxy server then you should set up the following parameters:
- Use a proxy sever — to enable operation using proxy server you should tick this field. Then you should specify the address and port of the server separated by colon. For example, proxy.company.com:3128.
- Login — login for the authorization at the server.
- Password — password for the authorization at the server.
If a login and password are not needed then you should leave those fields empty. You can get the parameters specified above from your system administrator.
Processing Public Requests
In this box, you can set up the parameters of the public access to the system for the components of integration with external web resources.

The following options are available here:
- Allow public access
Unauthorized (public) connection with TeamWox is used for the integration of the Service Desk and Chat with external web resources. If public components are not used, this type of connection can be disabled by unticking this option.
- Consider the X-Forwarded-For header for requests from the following IP addresses
Users can enter the system or send requests to it via the public services through different proxy servers. At that IP addresses of proxy servers will be displayed in the chat dialogs, in the system journal entries, etc. If an address of such proxy server is specified in this field, the TeamWox system will try to recognize the real IP address of a user using the "X-Forwarded-For" header. One should consider that only the IP addresses of trusted servers should be specified here, where the possibility of passing of fake addresses is eliminated.
The option works only for the public components of the "Chat" and "Service Desk" modules.
- Allow use of HTTP
By default the public connections are going through the secured HTTPS protocol through port 443. But if the certificate installed for the system is self signed (e.g. a default certificate issued by MetaQuotes Software CA), problems may occur while sending public requests due to the Security Policy of your browser. In this case you should allow the use of non-encrypted connection via the HTTP protocol through port 80 for the public components to work. To do it, tick off this field.
Once having bought and installed a certificate issued by a trusted certificate authority, you should disable the "Allow use of HTTP" option. |
To save your modified settings, press the "Update" button. If you want to cancel the changes you made, you should press "Cancel".