- Welcome
- TeamWox Communicator
- Diagrams
- Object Settings
- Plotting Diagrams
- Scene
- Editor
- Templates
- User Details
- Getting Started
- Browser Settings
- Calendar
- Calls
- Charts
- Exit
- File Viewers
- Filters
- Notifications
- Certificate Installation
- Interface
- List of Assigned
- Mind Map
- Permissions
- Search
- Status
- Google Translate
- Windows
- Home
- Tasks
- Documents
- Service Desk
- Chat
- Organizations
- Contacts
- Board
- Team
- Products
- Accounting
- E-Bank
- Search
- Calendar
- Telephony
- Administration
- Projects
Object Settings
The diagram editor allows to set up an individual style for each object, to join them in groups, etc. The setting up of object can be performed via the right toolbar of the diagram editor or via the context menu.
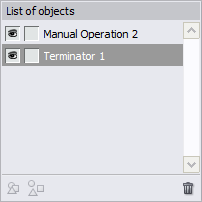
List of Objects 

This window displays the list of all objects that present on the sheet. There are two fields to the right of their names:
- By putting and removing the
 flag at the first field you can turn on/off displaying of the object on the sheet.
 - By putting and removing the
 flag at the second field you can allow/restrict editing of the object.
The lower part of the window contains the following commands:
 — group selected figures for managing them together. You can select several figures by holding "Ctrl" key.
 — disjoint a group of figures.
 — delete selected objects.
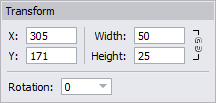
Transform 

In this window you can set up the precise coordinates, the size of the object and its angle of rotation:
- X — the coordinate of the upper left tie point on the horizontal axis.
- Y — the coordinate of the upper left tie point on the vertical axis.
- Width — the width of the object in pixels.
- Height — the height of the object in pixels.
- Rotation — the angle of rotation of the object. The function of rotating is available only for some of the object, for example for the "Main Frame" from the cause and effect diagram group.
If you close the  chain that joins the width and height fields then those parameters will be changed in proportion to each other.
Text Format 

The setting up of text inside the object is performed here: the font, the size and the color.
Style 

The style of the object is set in this window:
- Line — the color and the thickness of the line the object is bordered with.
- Fill — the initial color, type and the final color of the object filling.
Alignment 

You can open this window only if you select two or more objects. Using the commands of this window you can align the figures relatively to each other:
 — align selected object by their left edges.
 — align the centers of objects by the horizontal axis.
 — align selected objects by their right edges.
 — align selected objects by their top edges.
 — align the centers of objects by the vertical axis.
 — align selected objects by their bottom edges.
Context Menu of Objects
In order to open the context menu you should click with the right mouse button at a selected object on the sheet. It allows to execute the following commands:
- Edit (F2) — start editing the text inside the object.
- Transform (F3) — start editing the position and size of the object.
- Style (F5) — open the window of editing the style of the object.
- Text (F6) — open the window of setting up the format of text inside the object.
- Delete (Delete) — delete the object from the sheet.
- Copy style — copy all style settings of the selected object;
- Paste style — apply style settings copied from another object to the selected one.
- Note (F9) — open the window of writing a comment to the object. A red triangle is displayed at the top right corner of a selected object that has a comment. When viewing a ready diagram, the comments are displayed as a pop-up help if the mouse cursor is put over the object.
- Replace — open the window of replacing the selected figure. When replacing, only the figure itself is changed, all the style settings stay the same.
If you select several object then the "Group" and "Ungroup" commands will appear in the context menu. Using them you can perform the corresponding actions.