Import of Contacts
In order to start importing contacts you should press the "Import" button, located at the upper part of the "Contacts" tab.

The process of importing consist of several stages:
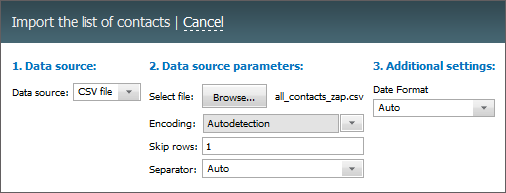
1 Data Source
The following is specified at this stage:
- Data source — in this field you should specify the format of a file that you're going to import. Only the *.CSV files are supported at the moment.
2. Data Source Parameters
The following parameters are specified here:
- File — in this field you should choose a file to be imported by pressing the "Browse" button.
- Encoding — the selection of encoding of the imported file.
- Skip rows — the number of rows that should be skipped in the beginning of file.
- Separator — separator that divides different data by contacts in the file (comma, dot or tabulation character). If the "Auto" variant is chosen, the identification is performed automatically.
The imported file should not contain unclosed quotes and brackets. Otherwise, the imported data may be incomplete. |
3. Additional Settings
Additional parameters are specified at this stage:
- Date format — the selection of date format in the imported file. If the "Auto" variant is chosen, the identification is performed automatically.
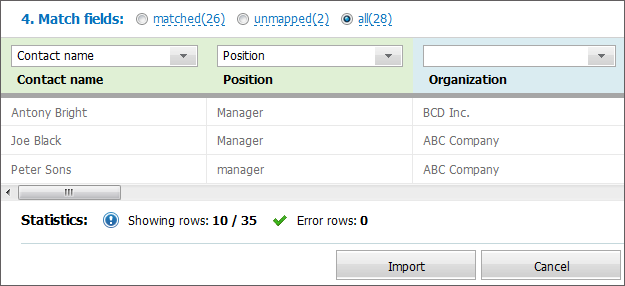
4. Match Fields
At this stage you should match the fields of the file with the fields in the system:

The preview window shows first 10 lines to be imported. Columns that are matched to a field in the system are green colored, and the ones that are not are blue. To switch between matched and unmatched fields, use the corresponding commands in the upper part of the box.
To match a column with a field, press the  button in the upper part of the table. Obligatory fields are marked with the
 ![]() in the list.
in the list.
It is obligatory to specify the "Contact name" field when importing contacts. |
Once you've finished checking and matching columns you should press the "Import" button. If the import was performed incorrectly, you can delete all the entries by creating corresponding filter and then pressing the "Delete all" button, located in the upper part of the tab.