- Welcome
- Home
- Tasks
- Documents
- Service Desk
- Chat
- Organizations
- Contacts
- Board
- Team
- Products
- Accounting
- E-Bank
- Search
- Calendar
- Managing Calendars
- Administration
- CalDAV
- Managing Events
- Event Settings
- Import
- Permissions
- Reports
- Calendar Types
- Representation of Events
- Viewing Events
- Events Widget
- Telephony
- Administration
- Projects
Event Settings
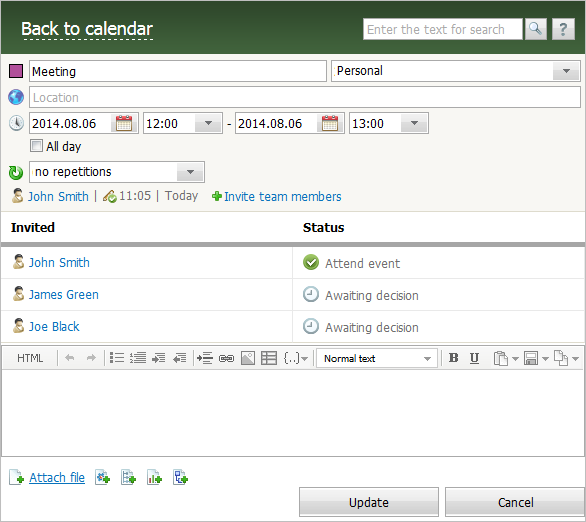
When creating or editing an event, the window of its settings opens:

Event settings can be divided into several parts.
General Settings
In the upper part of the window, the main settings of an event are specified:
 — name of the event. To the left of the name you can select a color for displaying of the event in the calendar. To do it, click the colored square
  .
.  — the place where the event will be held.
 — time of the event. You can specify the time manually or using the interactive calendar that opens when clicking
  . If the "All day" option is selected, the event time will be set to 00:00 - 24:00 of a selected day.
 — if an event should be repeated at regular intervals, set the periodicity. All subsequent events will be instantly marked in the calendar. For example, if you create an event for tomorrow and set "Every three days", the calendar instantly shows events for tomorrow, for 4 days from now, for 7 days from now, etc.
- No repetitions
- Every day
- Every other day
- Every three days
- Every workday (Monday to Friday)
- Every week
- Every other week
- Every month
- Every other month
 — the author of the event. This field is filled in automatically, and it cannot be changed.
Invited
In this part you can manage the list of user invited to attend the event. To invite a user (or a department) click ![]() Invite team members. After that, in the appeared list you can select users.
Invite team members. After that, in the appeared list you can select users.
The list of invited users is displayed below:
- Invited — the names of users who are invited to attend the event. Clicking the
 that appears when putting the mouse cursor over the name of a user, you can delete him or her from the list of invited users. Each invited user will see this event in the personal calendar and in the calendar, where it is created, in case the user has appropriate permissions.
 - Status — the current status of event attendance confirmation is displayed in this field for each user. A user can confirm or deny attendance when viewing the event.
Description
In the bottom part of the window, you can add a description of the event using the editor.
To save an event, click "Ok". To cancel changes, click "Cancel".