- Welcome
- Home
- Tasks
- Documents
- Add Document
- Attachments
- Create Document
- Create Folder
- Delete/Restore
- Edit Folder/Document
- Filters
- Information
- List of Documents
- Permissions
- Reports
- Setting Up WebDAV
- Documents widget
- Service Desk
- Chat
- Organizations
- Contacts
- Board
- Team
- Products
- Accounting
- E-Bank
- Search
- Calendar
- Telephony
- Administration
- Projects
Create Document
The "Documents" module allows to create different types of documents in it. To do it, one should press the "Create" button located in the top part of the tab:

In the opened menu one can go to creating of the following types of documents:
- Text — go to creating a text document.
- MindMap — create a mind map.
- Chart — create a chart.
- Diagram — create a diagram.
Once the maps, charts or diagrams are created in the editor, they are stored in the current folder. After that you can assign them for reading or signing through the window of viewing information about them. When creating a text document you can do this right away.
The document will be created in the folder you are currently in. |
The window of creating a text document contains two tabs:
Information

This window is closely similar to that of adding a document. You should enter the document name in the "Name" field. You can write a short comment on the document in the "Description" field. The comment will be shown as a balloon help if the cursor of the mouse is put over the document name in the list.
The main difference is the possibility to write the text of the document using the embedded message editor.
|
Assign
On this tab, you can assign users or groups for viewing or/and signing the document. This feature provides you with the possibility of controlling the employees' viewing and signing the document, so the extra traveling of colleagues between offices will become unnecessary. You can monitor the status of viewing and signing of a document in the window of viewing the information about the document.
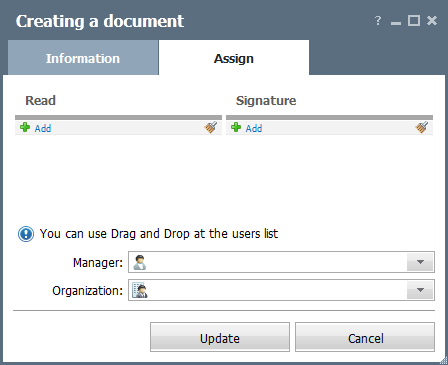
- Read/Signature — the list of users/groups that are assigned for reading or signing the document. Those groups and users will have the document displayed at the "In hand" tab where they can confirm its reading or sign it. A user or group can be added using the
 Add button. The list of users/groups that have the access to this document will be opened as soon as you press it. The instruction of how to use it is given in the "Interface Description -> List of Assigned" section. The
  button allows removing all the selected users and groups from the corresponding category.
 - Manager — in this field you can select an employee to be the manager of the document. The list of employees that have the access to this document will be opened as soon as you press the "Select" button.
- Organization — in this field you can bind the document to one of the organizations added to the corresponding module. The document that are bound to an organization are displayed at the special tab when viewing it. In order to choose an organization you should press the "Select" button.
If a document is assigned for signing/reading to an employee that doesn't have the access to folder the document is in, the employee will be able to view that document in the "In hand" tab and in the widget on the "Home" page. |
Once having performed all the actions described above, you should press the "Add" button. If you press the "Cancel" button, you will be passed to the previously visited window, whereas the document won't be added.