Working with Orders
The "Accounting" module allows adding and editing orders, as well as creating documents on paying selected orders. Besides, any order can be prepared for printing.
Adding and Editing Orders
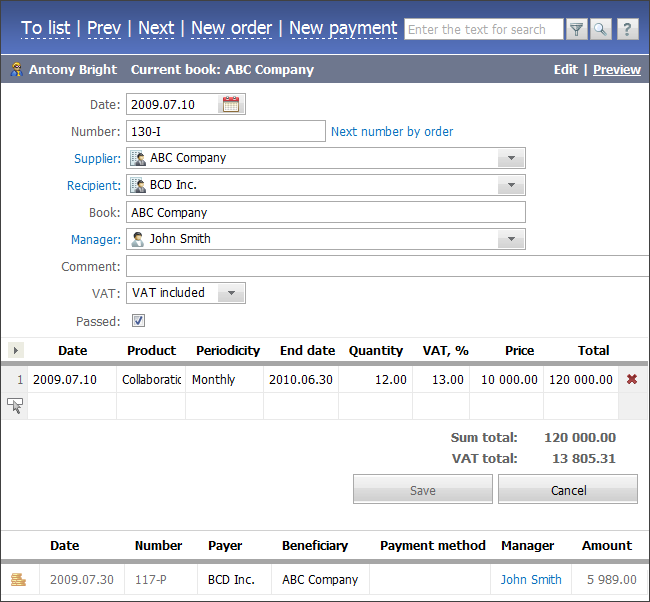
In order to create an order, the "New order" button should be pressed when viewing the list of documents or viewing an order. In order to edit an order one should enter it from the list of documents.

The upper part of the window for working with orders contains several buttons:
- To list — return to viewing the list of documents;
- Prev — go to viewing the previous document;
- Next — go to viewing the next document;
- New order — go to creation of a new order. Automatically the new account inherits parameters of the current order, except for the number - the successive number is assigned to the new order.
- New payment — open the window of creating a payment on this order. The data is also filled in automatically.
Below to the right there is a switcher between order editing and preparing it for printing.
After that three blocks of order parameters are located.
Common Details
In the first block common details of an order are specified:
- Date — date of the order. It can be specified manually or using the interactive calendar that is opened by pressing the
 button.
 - Number — number of the order. The successive number for this pair "supplier-recipient" can be assigned automatically by clicking on "Next on the list".
- Supplier — organization supplying a product or service. A click on this field will open the list of all organizations added into the corresponding module. Click on the name in this field to view details of a selected organization.
- Recipient — organization that receives a product or service. It is also selected from the list that is opened by a click on this field. Click on the name in this field to view details of a selected organization.
- Book — a book to which the order is bound is specified in this field. If you change the book, all the payments related to the order will be moved to the new book together with it.
- Manager — user responsible for the order. By default the user that creates the order is indicated here. In order to specify another user, one should click on this field and select a necessary user in the appeared list. Click on the name of this field to view the manager's details in the "Team" module.
- Comment — a text comment to the order.
- VAT — in this field you can select how VAT is accounted in the order:
- no VAT — VAT will not be included in the order.
- VAT included — VAT will be included in the price of products, thus it won't affect the total sum of the order.
- VAT separate — VAT will be included as a separate item in the order, thus it will be added to the total sum of the order.
- Passed — if this field is checked, the order is considered passed. Order that are not passed do not participate in the generation of reports.
In order to be able to pass orders a user must have the corresponding permission that can be granted by the system administrator. |
Information about Products and Services
The second block contains information about products and services to be paid for. In order to add a new product one should press the "Add record" button. After that the following data should be specified in the new line:
- Date — date of product or service delivery. It can be specified manually or using the interactive calendar that is opened by clicking on the
 button.
 - Product — name of a product or service. A left mouse-button click on this field will open a list of products and services added into the corresponding module of the TeamWox system.
- Comment — a text comment.
- Periodicity — if a product or service is to be delivered in a certain period of time, this period should be indicated in this field. In the appeared list the following variants are available: "Daily", "Weekly", "Monthly", "Quarterly" and "Yearly".
- End date — if a product or service is to be delivered periodically, the delivery end date can be specified in this field.
- Quantity — amount of a product supplied. In case of the periodical delivery of goods/services, the quantity is calculated automatically: if the end date is indicated, the quantity is calculated up to this date, otherwise - up to the current date.
- Unit — product unit.
- VAT, % — VAT in percentage from the sum of order. This tax will be included in the sum of the order if you tick the "Include VAT" option. The amount of VAT will be shown in the "VAT total" field.
- Price — price per unit.
- Total — total price for a product/service.
|
In order to save all changes the "Create" button should be pressed.
Information on payments
If there are payments on this order, information on them is shown below. Click on a payment icon to view the payment.
Printing the Order
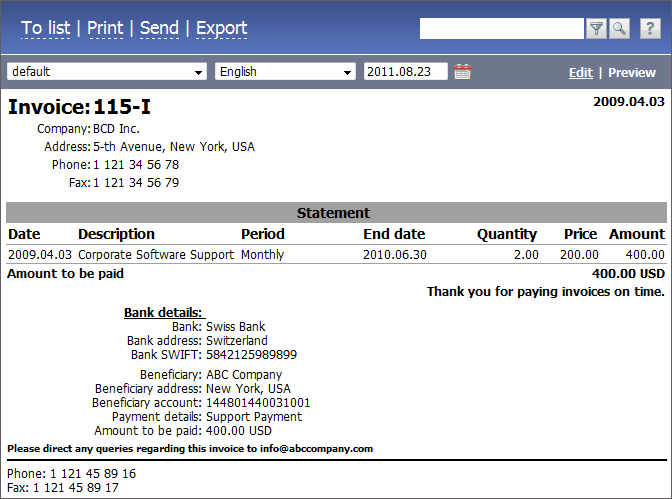
In order to prepare an order for printing, the "Preview" button located in the upper part of its window should be pressed. After that the prepared order will appear:

The printed version of an order is generated on the basis of templates. The "default" template is applied on default, but it can be changed for a custom one (if it exists) in the upper part of the window.
The field where one can specify a date to which the order should be made is located to the right of templates field. The date is specified using the interactive calendar that is opened by pressing the ![]() button. Choosing a date is worthwhile only if the order contains products that are supplied periodically. Using it one can generate an order for a specified period of supplying.
button. Choosing a date is worthwhile only if the order contains products that are supplied periodically. Using it one can generate an order for a specified period of supplying.
The upper part of the tab contains the following buttons:
- To list — go back to viewing of the list of orders.
- Print — if you press this button the order will be opened in a new tab of the browser, then it can be printed using its standard tools.
- Send — send the order to the e-mail of accountant of the payer company specified in the "Recipient" field of the order.
In order to return to the mode of editing the order, one should press the "Edit" button located in the top right corner of the window.