- Welcome
- TeamWox Communicator
- Diagrams
- Object Settings
- Plotting Diagrams
- Scene
- Editor
- Templates
- User Details
- Getting Started
- Browser Settings
- Calendar
- Calls
- Charts
- Exit
- File Viewers
- Filters
- Notifications
- Certificate Installation
- Interface
- List of Assigned
- Mind Map
- Permissions
- Search
- Status
- Google Translate
- Windows
- Home
- Tasks
- Documents
- Service Desk
- Chat
- Organizations
- Contacts
- Board
- Team
- Products
- Accounting
- E-Bank
- Search
- Calendar
- Telephony
- Administration
- Projects
Plotting Diagrams
In this section the actions of drawing objects and combining diagrams will be described.
Drawing Objects
In order to draw an object on the sheet you shoul drag it (Drag'n'Drop) from the left panel of the editor. Also you can draw several objects using the upper menu. To do it you should choose one of the tools. Then you should indicate the first point of the object on the sheet and shape the object holding the mouse button.
Alignment of Objects
There are several ways to align objects in the diagram editor:
Aligning relatively to each other by key points
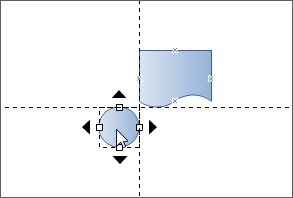
An object can be aligned by the edges or the center of another object. When you move it the dashed guiding lines appear, using them you can make the precise alignment.

Aligning by guiding lines
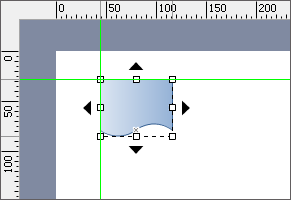
The diagram editor allows you to draw unlimited number of guiding lines the objects can be aligned by. In order to create a guiding line you should click with the left mouse button at the ruler and move the cursor to the list holding the button. As a result, the line (horizontal or vertical depending on the ruler you used) will be created.

If you move the edge or the center of the figure to a guiding line the effect of magnetizing will occur. After the alignment is finished you can hide the guiding lines.
Aligning relatively to each other via commands
Using the  button located at the right panel of the editor you can open the menu of aligning objects.
Changing Size
You can change the size of the object both at the sheet using your mouse, or through the special menu that is opened by pressing the  at the right panel of the editor. In order to change the size of the object at the sheet you should select it and drag one of its limiting points (Drag'n'Drop):

Also you can move the point the rotation of object is performed relatively to. It is located at the center of object on default.
Text Writing
You can type a text inside of any figure drawn on the sheet. In order to start writing it you should double-click on the object:

The style of the text can be changed through the special menu that is opened by pressing the  button at the toolbar in the right part of the editor.
Joining Objects
From every figure drawn on the sheet you can draw a joining line from nodes marked by crosses:

When you draw a line to a joining point of another object it is magnetized to it. The end points of the line are tied and the objects stay joined even if they are moved.
To join the objects you can use the "Line", "Curve" and "Connector" tools in the upper menu of the editor as well.
Adding Objects
If an object is selected the up, down, right and left arrows appear around it. Using them one add the other figures to the selected object in the corresponding directions:

Once one of the arrows is pressed a figure, chosen in the objects menu in the left part of the editor, will be joined to the selected one.
Replacing Object
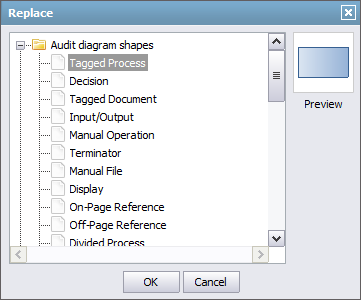
In order to replace the selected figure with another one, it is necessary to execute the "Replace" command in its context menu. The following window will be opened as soon as you do it:

In this window one should choose one of the available objects and press the "OK" button. When replacing, only the figure itself is changed, all the settings remain the same.
Grouping objects
The objects on the sheet can be grouped for moving, aligning and deleting them together. In order to group objects you should select them via the mouse holding the "Ctrl" key. After that you should press the  button at the upper toolbar or in the "List of objects" menu. In order to ungroup the objects you should press the
  button.
To save the created diagram you should press the  button located at the upper toolbar. You can close the diagram editor as soon as you do it. The diagram will appear in the list of attachments of the message editor.