- Welcome
- Home
- Tasks
- Documents
- Assigned
- Delete Mailbox
- Filters
- Email List
- Create/Edit Mailbox
- Create Mail
- Permissions
- Reply/Forward
- Reports
- Service
- Working with Spam
- View Mail
- E-Mail Widgets
- Service Desk
- Chat
- Organizations
- Contacts
- Board
- Team
- Products
- Accounting
- E-Bank
- Search
- Calendar
- Telephony
- Administration
- Projects
View Mail
In order to start viewing an e-mail, you should press with your mouse on its subject. The following window appears, as soon as you press it:

An e-mail can be divided into two parts for convenience: the message itself and attachments.
Assigning
The  button is located under the "Back to list" button. You can assign the e-mail to another user by pressing it. The window of assigning users described in the "Interface Description -> List of Assigned section appears, as soon as you press it. Once the e-mail has been assigned, it is marked with the
 ![]() icon to the right of its subject.
icon to the right of its subject.
Subject
The subject of the correspondence is located below. The e-mail body will be hidden, if you press with your mouse on the subject. The repeated click will unhide the e-mail. This feature is used, in cases the correspondence contains a huge number of messages, so you can easily navigate through them and have every e-mail near at hand. The incoming e-mails have the ![]() icons and outgoing have the
icons and outgoing have the ![]() icons.
icons.
Binding to Organization
The  button is located to the right at the same level. The window of choosing an organization appears, as soon as you press it. The instructions of how to use it are given in the "Interface Description -> List Manipulations section. This feature is intended for attaching the mail to a specific organization. This can be used for further creating of filters "from organization(s)". Once the mail is assigned to an organization, the name of the organization will appear to the right of the "Organization" button. The "Address" column in the mail list will also contain the
 ![]() special and the name of the organization instead of the e-mail address. This binding will be applied only to the current message (or chain).
special and the name of the organization instead of the e-mail address. This binding will be applied only to the current message (or chain).
The automatic binding of messages to organizations by e-mail address functions in the TeamWox system. |
Details
The "Show details" button is located under the e-mail subject. The "E-mail details" window shown below appears, as soon as you press it:

This window contains the following information: e-mail subject, sender, recipient, size and header. You can download the e-mail to your computer in the *.eml format by pressing the ![]() Download button. To close this window, press the "Close" button.
Download button. To close this window, press the "Close" button.
Actions
The window of the message editor appears, as soon as you press the  Reply button. This window already contains the body of the original e-mail you are replying to. Once you have finished writing of the e-mail, you should press the "Send" button. If you want to cancel the replying, you should press the "Cancel" button. The "Send" button has an additional function: "Send and close".

The e-mail will be sent and closed (moved to the corresponding section "Closed"), as soon as you press this button. This function can be useful, in case you already know that this reply is the last in this correspondence.
The more detailed information about the "reply" function is given at the Reply/Forward section. |
The e-mail will be moved to the "Closed" folder, as soon as you press the ![]() Close button. Ideologically, the completed mail exchange should be closed just like a completed task, if you are not going to return to it anymore. The correspondence will not be lost, but separated from the actual mails at the same time.
Close button. Ideologically, the completed mail exchange should be closed just like a completed task, if you are not going to return to it anymore. The correspondence will not be lost, but separated from the actual mails at the same time.
If you view an e-mail created by yourself, the |

ID
# symbol is the permanent link to the message. You can copy the link using the corresponding command of the context menu and then insert it to other messages. A unique identifier that is automatically assigned to each mail is located to the right of the link. You can search e-mails by these identifiers. To do it, type the identifier with the "#" symbols before it in the search line. Search by identifiers can be performed only within the "E-Mail" module.
Link to Project
Emails linked to a project are marked with the icon ![]() and a link to the project. The link text is the same as the project name.
and a link to the project. The link text is the same as the project name.
Extended Actions
If you press the  button located to the right of the "Reply" button, the expanded list of actions will appear: "Reply", "Forward", "Add to contact list", "Encoding", "Print", "Close" and "Delete".

- The "Reply to all" button creates a new email with addressees copied from the "Cc" and "Bcc" fields of the initial email.
- The window of sending the e-mail will appear, as soon as you press the "Forward" button. You should fill out the only field "To" in this window (enter the e-mail address of the recipient). The window of the message editor located below will contain the exact copy of the e-mail you are forwarding. The "Send" button has an additional function, as well: "Send and close". This function can be useful, in case this e-mail has come to you by mistake.
- You can add the sender address to the contact list, if you press the "Add to contact list" button. The window of adding the contact will appear, as soon as you press it.
- You can switch the encoding of the e-mail by pressing the "Encoding" button. The list of available encodings appears, as soon as you press it: "Auto-select" (the necessary encoding will be chosen automatically), KOI8-R, KOI8-U, Windows-1251, Windows-1252, Windows-1255, UTF-8.
- To not forget about a read email, click "Mark as unread", and it will be displayed as a new one — with a bold title in the list.
- The "Spam" button is intended for moving the message to the filter of the same name. The instructions of how to work with spam are given at a separate section.
- You can prepare the message for printing by pressing the "Print" button. As soon as you press it, the message will be opened in a new tab. Then you can print it out using the standard functions of your browser.
- Using the "To clipboard" command you can copy the selected email to the clipboard and then paste its content in a task, another email, service desk request, comment, etc.
- The "Translate" button allows translating the email using the Google Translate service integrated in TeamWox.
The e-mail body itself is located below.
In order to return to the list of e-mails, you should press the "Back to list" button located in the upper part of the window of e-mail viewing.
If you are currently viewing a branch of e-mails, then the expanded list of actions contains an additional button "Separate".

You can separate an e-mail from the e-mail chain by pressing that button. The e-mail will be moved to the list of e-mails, as soon as you press it. Both this e-mail and the branch of the e-mails, from which it has just been separated, will be marked as unread.
Reply to an Invitation
TeamWox provides a feature for a quick reply to invitation emails.
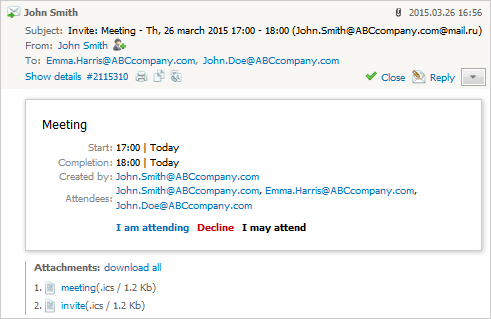
Use one of the three buttons to reply to an invitation: "I am attending", "Decline" or "I may attend".
When you click on "I am attending" or "I may attend", an event is automatically added in the "Invitations" calendar and a message with a reply is sent to email address of the person who has sent the invitation.
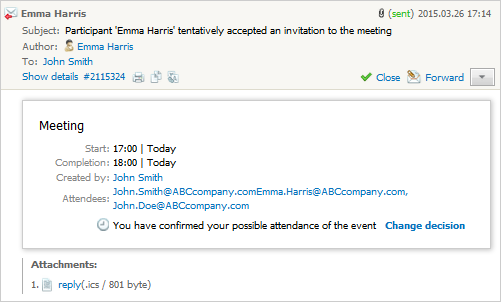
To change a decision about attendance of the event, click on "Change decision".
Journal of Working with Mail
If the list of employees assigned to the message is changed or if the message is moved to a filter, the corresponding entries appear in it:

This kind of entries are displayed at the end of the message. They contain the name of the employee that performed one or another action, and also the date when the action was performed.
Attachments Manipulations
If an e-mail contains attached files, you can copy them to the "Documents" module right from the mail-viewing mode by pressing the  button that appears to the right of the attached file's name when you put the cursor of your mouse over it. This button appears only if you have sufficient access rights.