- Welcome
- Home
- Tasks
- Documents
- Service Desk
- Public Component
- Creating/Changing Groups
- Creating a Request
- Assigned
- Comments
- Deleting Groups
- Filters
- Integration
- List of Requests
- Monitoring
- Permissions
- Reports
- Status of Requests
- View Requests
- Widgets
- Chat
- Organizations
- Contacts
- Board
- Team
- Products
- Accounting
- E-Bank
- Search
- Calendar
- Telephony
- Administration
- Projects
Creating/Changing Groups
Service groups are used to implement service rendering on a certain product by the group of responsible employees. The work with groups is concentrated in the left part of the Service Desk tab. Windows for the creation and editing of service groups are similar.
Group Creation
In order to start the group creation, press the ![]() New group button located in the left part of the tab under the "Assigned" block.
New group button located in the left part of the tab under the "Assigned" block.
Group Editing
To start editing group settings, the ![]() button located to the right of its name should be pressed. When a group is edited, the "Delete this group" button appears on each tab. Using this tab one can perform corresponding actions.
button located to the right of its name should be pressed. When a group is edited, the "Delete this group" button appears on each tab. Using this tab one can perform corresponding actions.
In the group editing mode, you can see its identifier and the identifiers of categories and products of the group. This information is necessary for setting up the public component of the "Service Desk" module. |
Group Information
Users that are not allowed to administer a group or the entire module "Service Desk" can view the information about the group. Instead of the commands for editing/deleting the ![]() command is displayed to the right of the group name. Once you execute it, the following window will appear:
command is displayed to the right of the group name. Once you execute it, the following window will appear:
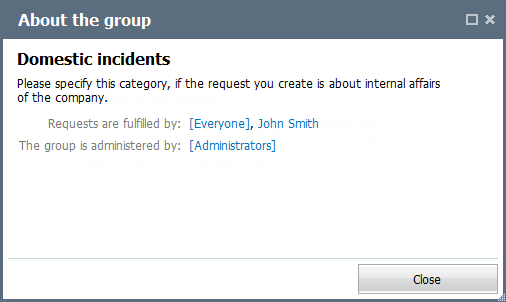
The following information is displayed here:
- Name of the group.
- Description of the group specified in its settings.
- Groups and users that have access to this group and are able to work in requests in it.
- Groups and users that have a permission to administer this group.
Group Settings
The window of group settings contains four tabs: "Information", "Categories", "Products" and "Permissions". When editing a group the title of the window contains its identifier specified in brackets, for example, (#1005). It is used for settings up the public component of the module.
Information
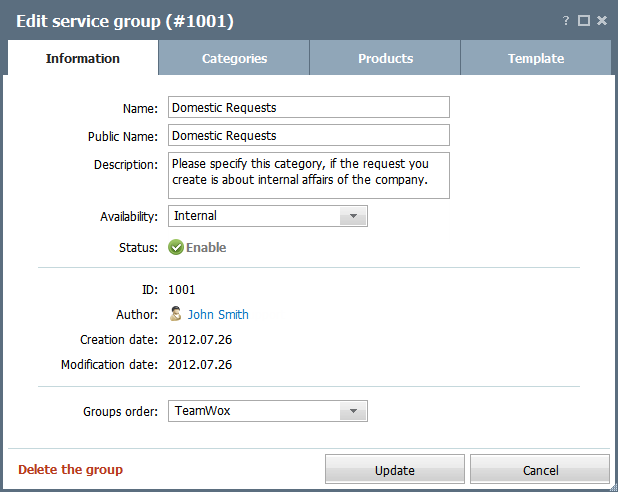
The following parameters are specified here:
- Name — group name.
- Public name — group name visible from the external website.
- Description — group description that is displayed in the information window.
- Availability — if "Internal" is selected, the group will be available only to users inside the system. The "Public" option will enable the work of users from external resources, at that the additional section, "Incoming" appears in the group.
- Status — press the
 button to disable the group. The button will become gray. In the disabled group one cannot create requests or write comments to them.
 - ID — identifier of the group that is used for setting up the public component.
- Author — name of the employee that created the group.
- Creation Date — date of creation of the service group.
- Modification Date — date of last modification of the service group.
- Groups order — this option allows specifying the position of group in the list displayed in the left part of the module. Here you can choose one of the existing groups after which the edited group will be located.
Categories
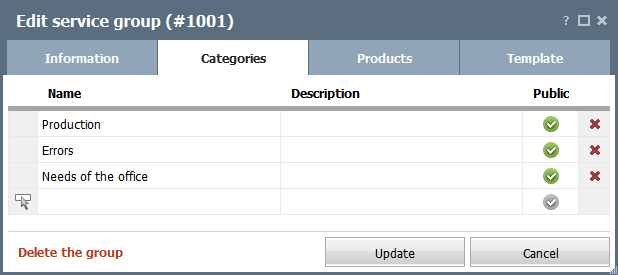
In this tab one can create categories to distribute requests within the group. To create a category just click on a empty row and start specifying its parameters:
- # — identifier of the category that is used for setting up the public component of the module. This field is filled out automatically as soon as the group settings are saved.
- Name — name of the category.
- Description — description of the category.
- Public — public status of the category. If you check this field, the category will be available from external resources.
Use a double click to start editing fields. To delete a category click the  button at the end of a row.
Products
Here one can add names of products that will be serviced by this group. The corresponding choice will be necessary when adding requests.
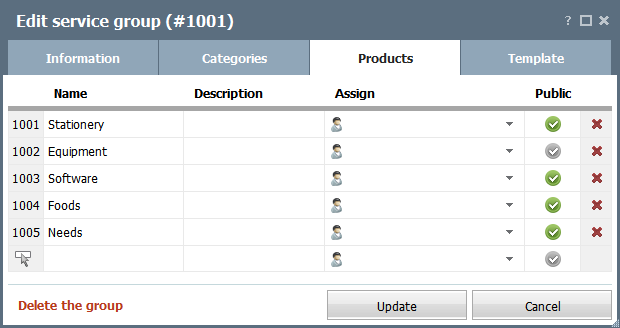
To create a product just click on a empty row and start specifying its parameters:
- # — identifier of the product that is used for setting up the public component of the module. This field is filled out automatically as soon as the group settings are saved.
- Name — name of the product.
- Description — description of the product.
- Assign — in this field you can choose an employee or a group for automatic assigning of new requests by the specified product to them.
- Public — if you check this field, the product will be available to be chosen from external resources.
Double-click on a field to edit it. To delete a category click the  button at the end of a row.
Templates
To make working with requests easier for new employees, an administrator of the service group can prepare a template for requests in it.
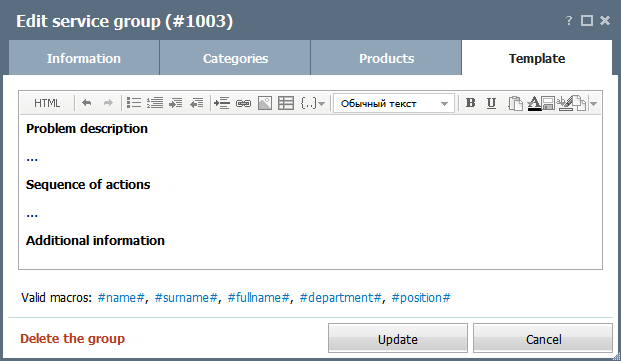
The text specified on this tab will be automatically added to each new request created in this service groups.
In the text you can use the following macros, which substitute information about the current employee:
- #name# — first name of the employee.
- #surname# — second name of the employee.
- #fullname# — full name of the employee.
- #department# — name of the department.
- #position# — position of the employee.
Permissions
Permissions for the service group are set up here.
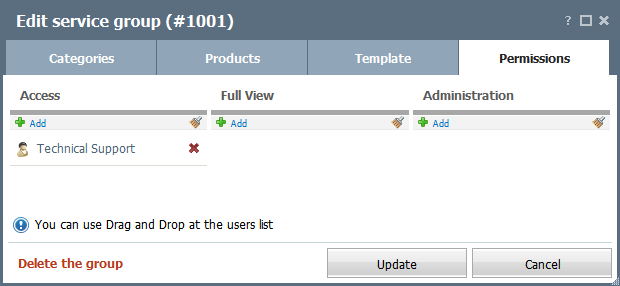
You can assign or delete users/groups from the list of right-holders using the ![]() Add and
Add and  buttons. Pressing on the
 ![]() Add button opens a window for assigning users. It is described in the "Interface Description -> Lists of Assigned" section. For clearing the list of assigned the
Add button opens a window for assigning users. It is described in the "Interface Description -> Lists of Assigned" section. For clearing the list of assigned the  button. If you need to delete only one user/group from the list of assigned, press the
  button located to the right of each selected user/group.
Permissions are divided into the following categories:
- Access — users (groups) can see this group and create requests in it. They have access only to their own requests and personally assigned ones.
- Full View — all requests in the group can be viewed.
- Administration — allows to edit group settings. If the "Full View" right is enabled, administrators can add and delete any comments in requests as well as whole requests.
Access rights cannot be inherited. For example, the administration right does not allow viewing requests in the group. The right for the full viewing is necessary for this purpose. |
After all group parameters are set up, the "Add" button should be pressed.