- Welcome
- TeamWox Communicator
- Diagrams
- Editor
- Templates
- User Details
- Additional Details
- Calls
- Contact Details
- My Groups
- Personal Details
- Payments
- Softphone Settings
- Security
- Sessions
- Tabs Order
- Telephony
- Sounds
- Working time
- Getting Started
- Browser Settings
- Calendar
- Calls
- Charts
- Exit
- File Viewers
- Filters
- Notifications
- Certificate Installation
- Interface
- List of Assigned
- Mind Map
- Permissions
- Search
- Status
- Google Translate
- Windows
- Home
- Tasks
- Documents
- Service Desk
- Chat
- Organizations
- Contacts
- Board
- Team
- Products
- Accounting
- E-Bank
- Search
- Calendar
- Telephony
- Administration
- Projects
Personal Details
This tab contains the information concerning the registration of the user in TeamWox. Here you can also upload your photo.

The following information should be entered here:
- Name — the user's real first name.
- Surname — the user's real last name.
- Patronymic — the user's real patronymic.
- Birthday — the user's date of birth. It can be specified using your keyboard (in the format of "YYYY.MM.DD") or chosen through the interactive calendar, that can be opened by pressing the
 button.
 - Sex — the user's sex (male or female).
- Status — status of the user:
- Active — the user works in the system;
- Registered — this status is intended for management of the company employees that do not need working in the TeamWox groupware. Registered users are not counted when checking the license limitation, and they cannot log in the system, however they are displayed in the company structure. For such users a HR manager can store personal details, arrange payments and fill out the table of working time.
- Deleted — the user is deleted and cannot authorize using this account;
- Disabled — the user is disabled and cannot authorize using this account;
- Moved — the user is moved and cannot authorize using this account;
- Fired — the user is fired and cannot authorize using this account.
- Working since — the user's hiring date. It can be specified using your keyboard (in the format of "YYYY.MM.DD") or chosen through the interactive calendar, that can be opened by pressing the button.
- Occupation — the user's position in the company.
- Department — the department the user belongs to.
- Description — additional information about the user.
- Location — location of the user's work place (building, office).
- Language — the interface language can be chosen by pressing the down-arrow button at the end of this field.
- Text entering from right to left — if this option is enabled, the interface of the system will be displayed from right to left the same as the typed text.
- Enable calls via SIP — enables/disables the possibility of making calls from TeamWox using a softphone.
- Prefix to dial via SIP — in this field you can indicate an individual prefix for dialing phone numbers when making calls via softphone. This prefix will be used for all numbers. For example, it can be used for making trunk calls. If a prefix is not indicated here, then the common one specified in the system settings will be used.
- Replace + with — this option automatically replaces "+" before telephone numbers with numbers specified in this field when you make calls from TeamWox. In some cases, it is necessary to enter 00 'or another number instead of ' + ' as a number prefix.
- Compact layout — this option allows to hide the header of the program that contains the logo, which allows to use the maximum of workspace.
- Disable automatic notification about changes — if this option is enabled, user stops receiving notifications about different events in the system (changes in tasks, requests, new emails, etc.). If the option is enabled, the
 icon is displayed at the notification area.
 - Calendar type — here you can select the calendar type: Gregorian or Jalali.
- Timezone — you can choose a timezone from the pop-up list that opens if you press with the left button of your mouse on this field. If the "Daylight Saving enabled" field is checked, then the system will automatically adjust the time for daylight saving. This checkbox is not active if the "Auto Detection" of the timezone is chosen (in this case, the timezone will be set according to the one chosen on user's PC).
|
To save any changes you have made, you should press the "Update" button. Then you should restart the page or press the "Refresh" button of your browser.
Photo Uploading
In order to upload a photo, you should press the  Edit button. A photo can be either uploaded from a file or made directly using a webcam.
Uploading a Photo from a File
A photo from a file should be uploaded on the "Download from HDD" tab. This must be performed in two stages:
|
|

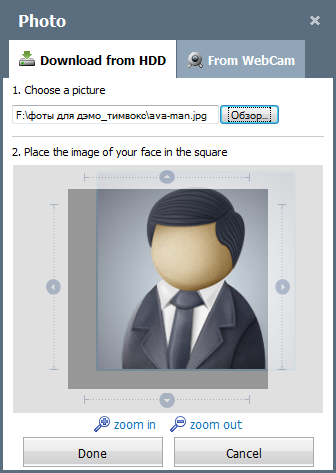
At the first stage, you should choose a photo by pressing the "Browse" button. The standard window of file choosing will appear. You should choose in it the necessary file in JPG, BMP, GIF, PNG or TIF format and then press the "Open" button. The next step is to press the "Upload" button. Once you've pressed it, you are passed to the second stage where you should place the necessary fragment of the picture in the square located in the center using arrows or your mouse. You can also resize the picture using the  and
and  buttons, respectively. Once you've obtained the desired result, you should press the "Done" button.
Uploading a Photo using the WebCam
In order to upload a photo using a webcam, you should go to the "From WebCam" tab.

The webcam should be properly installed on your PC, otherwise this function does not work. |
Once you've set the webcam in the necessary position, you should press the  button. A five-second countdown should start. You should be in time to look at the WebCam during this countdown. Once the picture is made, it appears in the window of photo uploading. If necessary, select the desired fragment of the obtained image and resize it. If you need to take another picture, you should press the
  button and repeat the actions described above. To finish the uploading, you should press the "Done" button. To cancel the uploading, press the "Cancel" button.
In order to delete your already uploaded picture you should press the  Clear button.