- Welcome
- TeamWox Communicator
- Diagrams
- Editor
- Templates
- User Details
- Getting Started
- Browser Settings
- Calendar
- Calls
- Charts
- Exit
- File Viewers
- Filters
- Notifications
- Certificate Installation
- Interface
- List of Assigned
- Mind Map
- Permissions
- Search
- Status
- Google Translate
- Windows
- Home
- Tasks
- Documents
- Service Desk
- Chat
- Organizations
- Contacts
- Board
- Team
- Products
- Accounting
- E-Bank
- Search
- Calendar
- Telephony
- Administration
- Projects
Setup
To open the setup menu of TeamWox Communicator, click  at the bottom of the window. After this the following menu will open:

The menu contains the following commands:
- Contacts — open a submenu to manage contacts. This command is available only if the "Contacts" tab is currently open.
- Unhide all — show all contacts. This command opens all the groups and contacts that were previously hidden. The same action can be performed using the keyboard shortcut Ctrl+U.
- Hide/Show offline — hide/show contacts that are currently offline. The same action can be performed using the keyboard shortcut Ctrl+O.
 Collapse all — close all the contact groups. The same action can be performed using key ",".
 Uncollapse all — expand all the contact groups. The same action can be performed using key ".".
 Options — open "Options" of the Communicator.
 Journals — open the folder containing the log files of TeamWox Communicator.
 Help — open TeamWox Help.
 About — open the "About" window with information about TeamWox Communicator: version, useful links and a copyright warning.
 Logout — log out of the system. After executing this command, the "Authorization" window appears.
 Exit — close TeamWox Communicator.
Access to TeamWox Communicator Functions
Access to specific functions of TeamWox Communicator can be set up for groups or individual users via the Administration module.
Settings of TeamWox Communicator
To open the setup window of TeamWox Communicator, click Options in the settings window described above. The settings window contains several tabs.
Common

This tab contains the network settings of the communicator:
- Server address — address of the TeamWox server, to which you want to connect.
- Login — user login to authorize in the system.
- Password — user password to authorize in the system.
- Download folder — the folder where downloaded files will be saved.
- Start the program automatically with Windows — if this option is enabled, TeamWox Communicator will start automatically at startup of Windows.
Audio

This tab is intended for setting up devices used for working with sound (calls and notifications) and network:
- USB phone — the USB phone used for calling. Recommended models of USB phones are listed in a separate section.
- Microphone — the device used for processing of input sound signal (microphone).
- Speaker — the device used for processing of output sound signal (sound playback).
- Ringing — the device used for playing the sound of ringing.
- Echo cancellation (AEC) — enables/disables the echo cancellation.
- Automatic control of volume level (AGC) — enables/disables the automatic control of the sound level.
- No sound transmission at pauses in conversation (DTX) — enables/disables the discontinuous (discrete) transmission. Enabling of this option increases the efficiency of the sound channel, since the transmission of sound is stopped during pauses in conversation. It is recommended not to disable this option.
Sounds

This tab is used for setting up sound notifications about different events:
- Chat message — a new message in the chat.
- Call — an incoming call.
To choose a sound notification, click with your mouse on the field against the corresponding event.
Proxy

If you connect to the TeamWox system through a proxy server, specify its settings here:
- Server — the IP address of the proxy server. Contact your system administrator to know this address.
- Login — a login to authorize on the proxy server. If the login is not required, leave this field blank.
- Password — a password to authorize on the proxy server. If the password is not required, leave this field blank.
- Telephony interface — the network interface used by TeamWox Communicator for listening of incoming calls. Also this interface is used for sending voice packages. In other words, all the traffic of voice messages will go through this interface.
A proxy server can also be configured from the connection dialog.
By default, the proxy server settings specified for Internet Explorer will be used here. |
If TeamWox Communicator cannot log on the proxy server during connection, a special window will appear, in which you need to specify correct data for connection.
Windows
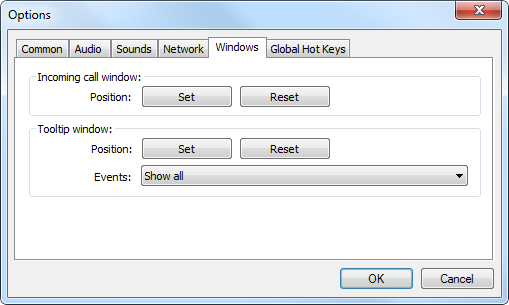
- Incoming call window:
- Set. When you click "Set", a sample window of subscriber call appears. Press the central mouse button (the wheel) and drag the window to the most convenient place to receive call notifications.
- Reset. Click "Reset" to move the window of incoming calls to the default position in the lower left corner of the screen.
- Tooltip window:
- Set. When you click "Set", a sample window of event appears. Press the central mouse button (the wheel) and drag the window to the most convenient place to receive event notifications.
- Reset. Click "Reset" to move the window of events to the default position in the lower left corner of the screen.
- Events: do not show, show all, show new.
Global Hot Keys

On this tab, you can set up global hot keys. These hot keys work always, both when the TeamWox communicator window is active and not active. To set up a hot key, double click with the left mouse button on a field against the necessary command. As you enter the editing mode, press a key or a key combination, which should be associated with the command.
- Restore/Minimize to tray — restore/minimize the application to system tray.
- Answer incoming call — accept an incoming call.
- End current call — end the current call.
To save the configuration changes click "OK." If you click "Cancel", changes to the settings will not be saved.