- Welcome
- Home
- Tasks
- Documents
- Service Desk
- Chat
- Organizations
- Contacts
- Board
- Team
- Products
- Accounting
- E-Bank
- Search
- Calendar
- Telephony
- Administration
- Groups
- Communicator
- Identification
- Permissions
- Users
- Users
- Activation
- Articles
- Backup
- Connection
- Console Commands
- Export
- Firewall
- Overview
- Import
- Import from AD
- Journal
- Service Operations
- Modules
- News
- Permissions
- Requests
- Security
- Settings
- Sounds
- Statistics
- Updating
- Projects
Identification
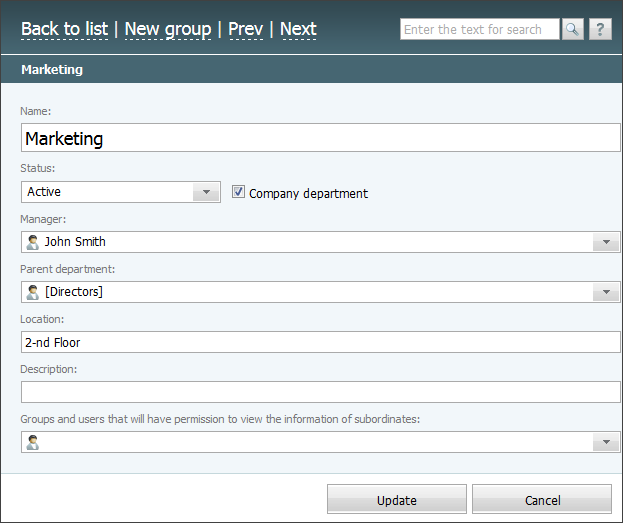
The "Identification" tab is used for setting up the common parameters of the group.

The following parameters are represented here:
- Name — the name of a group.
- Status — you can choose a group status in the list that opens if you click on this field:
- Active — a group that is working now, there are users in the group and it is visible in the assigning lists;
- Deleted — a group that is deleted. Groups are not deleted physically, due to some related data remained. A group cannot be deleted in case it includes at least one user;
- Disabled — a group that is disconnected from working in the system, it is unavailable in the assigning lists and is not displayed in the company structure. This status is intended for creating groups for future use. A group cannot be disabled in case it includes at least one user.
- Hidden — the group is unavailable in the assigning lists and in the company structure. Using the hidden groups, you can assign permissions in bulk to specific groups of employees.
- Company department — this field is intended for checking the departments really operating in your company. If this option is selected, the group icon in the list is golden -
 , unlike the others -
  .
. - Manager — you can specify the manager of the group in this field. You can choose the necessary person in the list that appears if you press
 that is located at the end of this field. The standard window of assigning users appears if you press it. Usage instructions for that window are given in the Interface description -> List of Assigned section.
 - Parent Department — here you can specify one of the previously created departments if the group under creation is its subdivision. In order to choose one, you should click on this field. At the same time, the window of choosing group should appear. Usage instructions for that window are given in the Interface description -> List of Assigned section.
- Location — here you can specify the workplace location of the head of a group (building, office).
- Description — in this field, you can enter a group description that will be shown in the corresponding column of the list.
- Groups and users that will have permission to view the information of subordinates — here you can select users and groups that will have permissions to view the tasks of all users in that department. For example, you can grant permission to your security officers to view the tasks of a certain branch or the entire company according to the established security policy.
|
In order to save the settings, one should press the "Update" or "Add" button, depending on the current action (editing or creating the group).
Principles of Hierarchy Creation:
- Only the groups that are marked as company department are displayed in the hierarchy;
- The top of the hierarchy is the company that owns the system;
- The groups that don't have the parent departments are displayed below;
- The groups that have the corresponding parent department are displayed lower, etc.
To make the work of creating groups structure more convenient the "Hierarchy" button is implemented in the top part of the "Groups" tab. Using it you can go to the viewing of corresponding information in the "Team" module.
← Groups
Permissions →
|
 .
.