- Welcome
- Home
- Tasks
- Documents
- Service Desk
- Chat
- Organizations
- Contacts
- Board
- Team
- Products
- Accounting
- E-Bank
- Search
- Calendar
- Telephony
- Administration
- Groups
- Users
- Communicator
- Contact Details
- Groups
- History
- Identification Details
- Permissions
- Personal Details
- Security
- Widgets
- Activation
- Articles
- Backup
- Connection
- Console Commands
- Export
- Firewall
- Overview
- Import
- Import from AD
- Journal
- Service Operations
- Modules
- News
- Permissions
- Requests
- Security
- Settings
- Sounds
- Statistics
- Updating
- Projects
Security
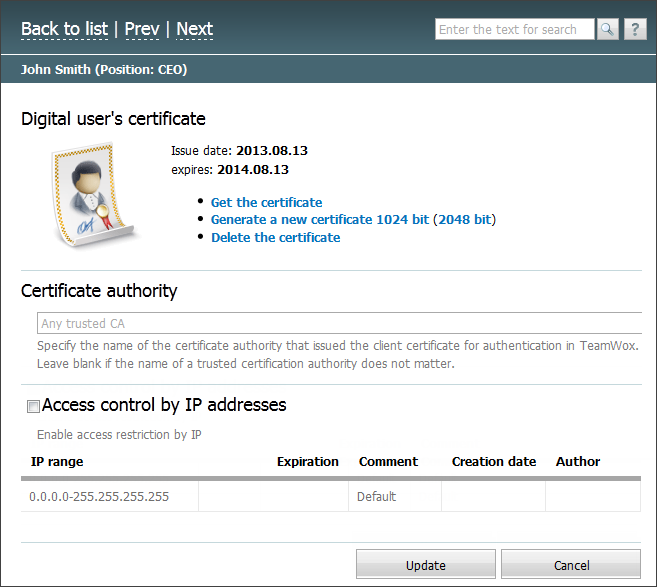
The "Security" tab is intended for managing access of users to the TeamWox system. It is divided into two parts: the uppers one is intended for managing user certificates and the lower one - for managing the list of allowed IP addresses.

Digital User's Certificate
The digital user certificate is intended for the authorization in the system. Using of it increases the security of working and also makes the usage of logins and passwords not necessary:
- Get the certificate — using this command you can export the certificate in the *.pfx format for user to install. It is necessary to specify the password for the certificate when exporting it. The password is required for the further installation. To make the authorization by certificates available you should enable the corresponding option in the system security settings.
- Generate a new certificate — if the certificate hasn't been generated yet then only this command is displayed in the upper part of the tab. By executing it you can generate a certificate on the basis of the common one installed for the system. The window where you should specify the duration of certificate in years and click "OK" will appear as soon as you press it. After a few seconds the certificates will be generated and its details will appear in the upper part of the tab.
- Delete the certificate — using this button you can delete the generated certificate.
The 1024 or 2048 bit version of the certificate can be generated for a user. |
Certificate Authority
In this field you can specify the name of a certificate authority that has issued the certificate of the user. This parameter is required when your company uses several Certificate Authorities, for example, in each of the offices. By specifying the name of a particular CA, you eliminate a potential authentication error of two users with the same name.
List of Allowed IP Addresses
In the lower part of the tab you can restrict the access of an individual user to the TeamWox system by IP-addresses. In order to enable this feature you should tick the "Enable access restriction by IP" field.
In order to create a range you should press the ![]() Add button. As soon as you do it, a new line will appear in the list; there you should specify the following details:
Add button. As soon as you do it, a new line will appear in the list; there you should specify the following details:
- IP range — this field is intended for specifying an IP address or a range of addresses (for example, 8.12.156.54-8.12.156.100), which should be allowed for receiving requests from.
- Expiration — this field is intended for specifying a date of expiration of the ban. This is done using the interactive calendar.
- Comment — text comments to the ban.
- Creation date — the automatically generated date of creation of the ban is displayed here.
- Author — this field displays the name of user that created the ban.
To change a field in a ban line, you should double click with the left mouse button on the necessary field. To delete an entry, press the  button, that appears when you put the mouse cursor over the line.
General restrictions of accessing the system by IP address are set at the "Firewall" tab. |